How to Draw Eyes Step by Step
This tutorial shows how to draw a realistic pair of eyes in twelve steps and provides detailed pencil line drawing and shading examples.
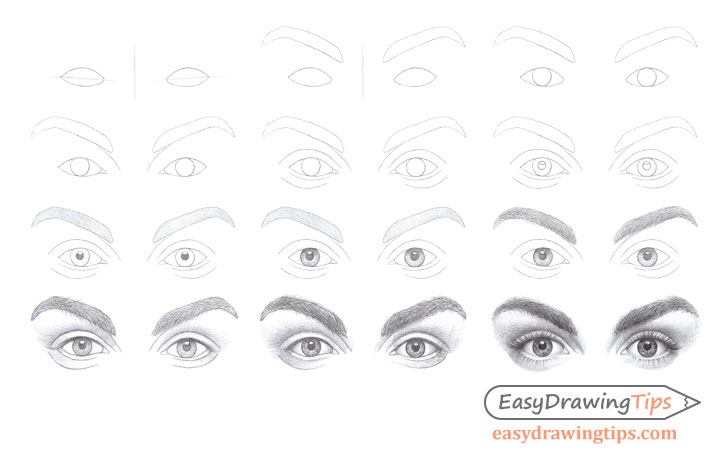
The tutorial goes from basic construction lines to a finished pencil shaded drawing. The examples are of female eyes but you can use all of the same steps/principals for drawing male eyes as well.
As the examples are in pencil it’s of course recommended that you do the tutorial in pencil as well. It may also be helpful (while not required) to have a kneaded eraser.
Also be sure to keep your lines very light for the line drawing part of the tutorial. The lines in the examples are fairly dark just so that they are easier for you to see.
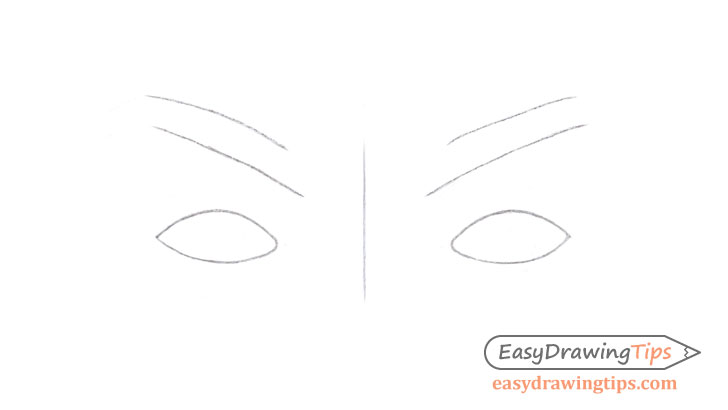
Step 1 – Draw an Outline of the Eyes
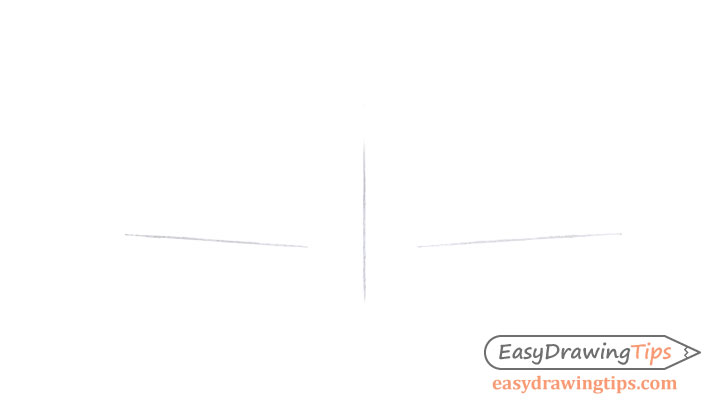
Begin this step by making a few simple guide lines. First draw a center line through the middle of your drawing area to help you insure that both eyes will be evenly spaced.
Next draw a pair of lines that will help you determine the angle of each eye. In this case they will be angled slightly downwards with their inner ends.
For examples of other eye types see:
How to Draw Different Eye Types Step by Step
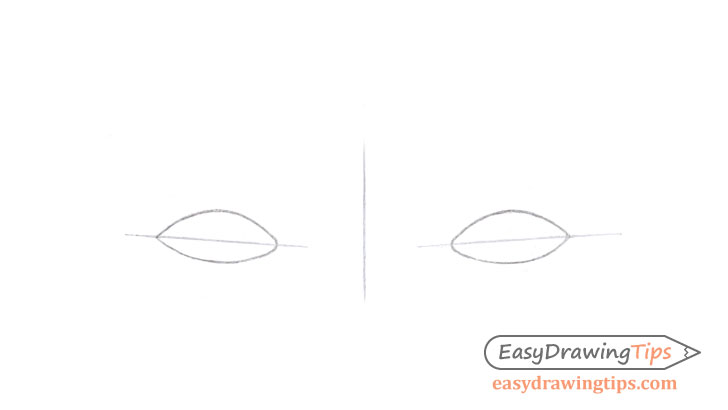
Draw the eyes based on the guide lines as shown above. However before you do that take a look at the explanation of their spacing below.
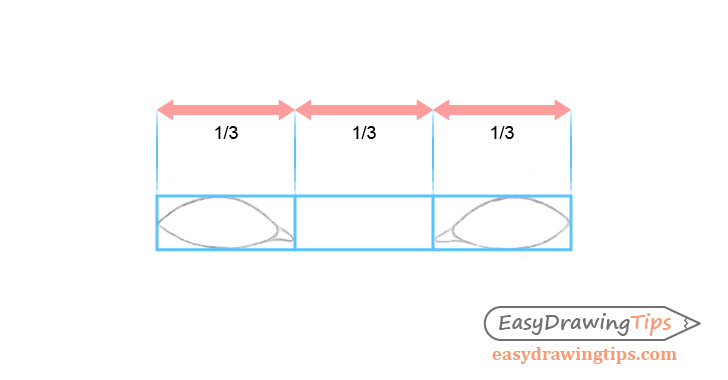
You will want to position the eyes so that when the tear ducts are added as shown above the spacing between them will be roughly enough to fit in another eye.
You can erase the angled guide lines for each eye once your done with this step.
Step 2 – Draw the Eyebrows
Begin by making a pair of lines for each eyebrow to indicate the width and angle of their largest section.
For drawing different types of eyebrows see:
How to Draw Eyebrows Step by Step
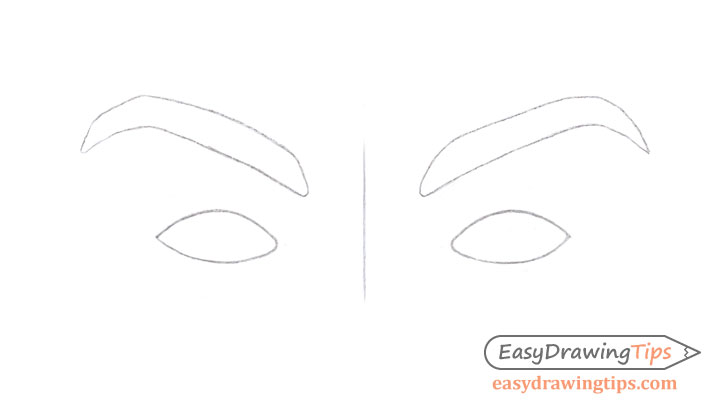
Onto the initial lines add the inner and outer sides. Usually the outer parts of the eyebrows will bend in the opposite direction as compared to the main section. Eyebrows will also tend to have more rounded inner ends and pointy outer ends.
You can erase the center line once done with this step.
Step 3 – Draw the Irises

Inside the outline of the eyes draw the irises. These will pretty much be circles which in this case are just slightly covered by the eyelids at the top and bottom.
Step 4 – Draw the Nose Bridge & Tear Duct Areas

Draw a pair of lines to indicate the bridge of the nose and then for each eye add the tear duct areas that were mentioned earlier.
Step 5 – Draw the Eyelids
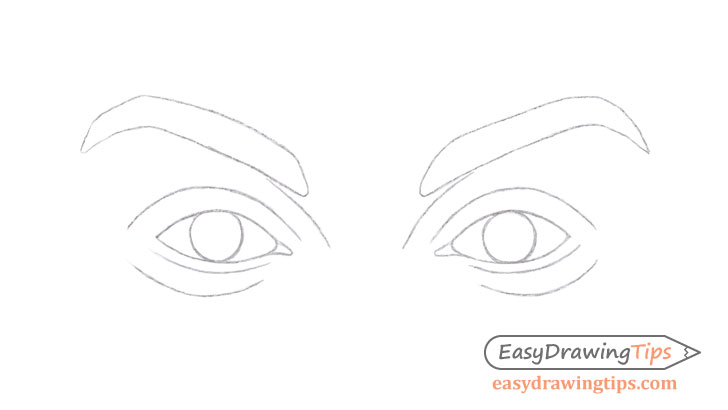
Around the outline of each eye add the eyelids. These will consist of three main parts. The upper eyelids, the lower eyelids and the edges of the lower eyelids.
Step 6 – Draw the Pupils & Finish the Line Drawing

Finish the line drawing by adding the pupil inside of each of the eyes. Inside of each pupil also indicate a small highlight area (light reflecting off of the smooth surface of the eyes).
Please note that the location of the highlights can change so they may be drawn in different places for different sets of eyes.
Step 7 – Add Basic Shading to the Pupils & Eyebrows
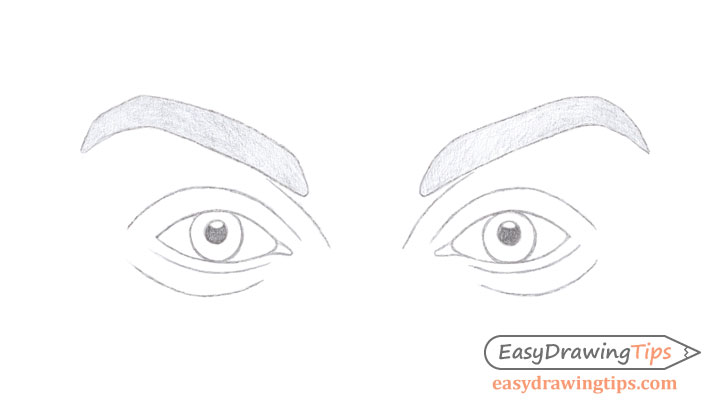
In this particular example the eyes will have fairly generic shading with most of the light coming from above. You can expect these types of lighting conditions in a well lit room or outside during daytime.
Begin by first shading in the pupils (leave the highlights white) with pretty much a solid dark grey and then shade in the eyebrows with a much lighter tone.
Step 8 – Shade the Irises
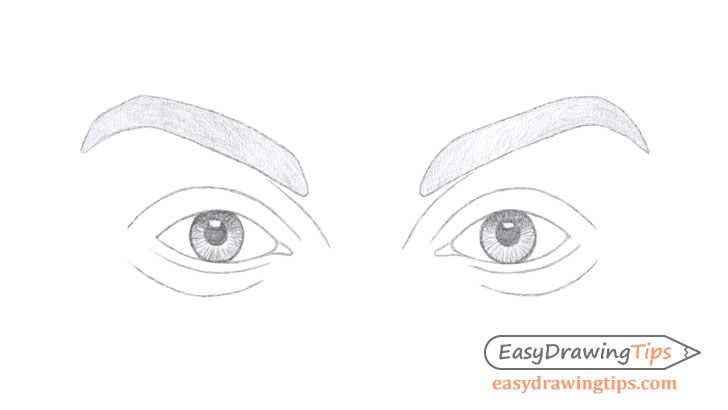
Shade in the irises by making strokes that go around the pupils (as shown in the example).
Next add a bit of a gradient towards the upper side of the irises. It should be darker towards the top and get lighter as it goes down.
Keep this shading lighter than what you want to have in the finished drawing as more layers will be added in over top in later steps.
Step 9 – Add the Eyebrow Hairs
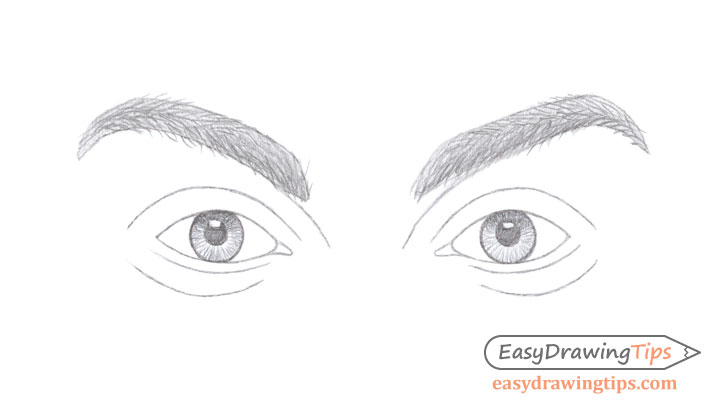
Begin adding the effect of individual hairs by making multiple short strokes along each of the eyebrows. These should go in the direction of the hair growth for each of their parts.
Again this is just the initial layer and more will be added over top.
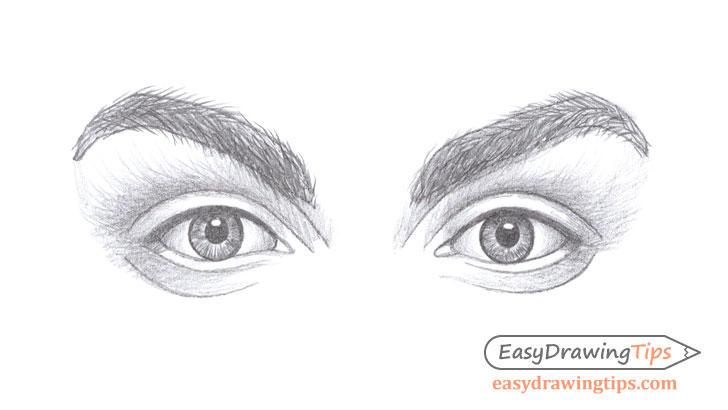
Step 10 – Shade the Eyelids

Shade the eyelids an the areas surrounding the eyes. Do this with a series of crosshatch strokes where you first add a layer going in one direction and then in another that is just slightly angled to the first one.
For more on different stroke type see:
Shading Techniques and Stroke Types Drawing Tutorial
Once again keep this layer of shading lighter than what you want to have in the final drawing. It’s goal is to first establish the placement of the main light and dark areas. You can then add in darker and smoother shading over top.
In this case the shadows will be placed as follows:
- Above the upper eyelids getting lighter as it moves towards the eyebrows
- On each end of the upper eyelids getting lighter towards the middle
- The outer corners of the edges of the bottom eyelids
- The outer corners of the bottom eyelids getting lighter as it moves towards the inner corners
Once done adding the shading to the eyebrows you can also add some dark shading running along the curve of the upper eyelids (where the eyelashes will be).
Step 11 – Shade the Whites of the Eyes & Refine the Shading
Shade the white of the eyes darker around gradually making the shading lighter towards the irises.
Once done you can then refine the shading of the entire drawing by adding more layers of strokes to bring it closer to the intensity that you want to have when done.
If any of the outlines are overly visible now may be a good time to eraser them. As mentioned at the start a kneaded eraser can be very helpful for this as you can constantly mold it to have pointy tips that can give you some nice precision when cleaning up your drawing. If you don’t have one you can simply use the corners of a regular eraser.
Step 12 – Finish the Eyes Drawing
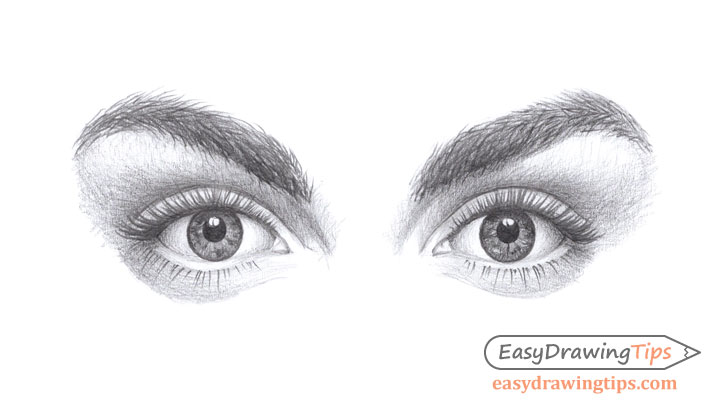
Gradually apply more layers of strokes to darken and smooth out the shading of the eyelids/around eyes areas until you bring it to the level that you want to have in the finished drawing.
Add in more strokes into the eyebrows. Make some of these thicker or darker while and others thinner or lighter. This will help create the effect of more natural looking hairs.
Smooth out the shading around the outer edges of the irises an draw some time dark patches into them as well.
Finally finish the drawing by adding in the eyelashes. Make them thicker on the upper eyelids and more sparse on the lower eyelids.
Draw each eyelash by pressing fairly hard on the pencil and then quickly pulling it away from the paper as you go. This should make them thicker towards the base and lighter/narrower towards the tips.
Conclusion
Hopefully this tutorial has helped you gain a better understanding into how to draw eyes.
For beginners in particular important to first create a good line drawing that has the correct proportions. If you don’t get this part right then the rest of your drawing will be off.
When shading it can be very helpful to apply the strokes in several layers. You also want to keep the completion of the shading roughly the same throughout the entire drawing. Meaning that you do not want to fully shade one area and then move on to the next one.
If for example you finish shading the eyebrows before adding any shading to the irises you may find that the eyebrows are now too dark in relation to them and the pencil no longer has enough value to go darker. This means you now have to erase all of the shading on the eyebrows. Even worse excessive erasing can make your drawing look messy to the point where you may have to completely start over completely.
Shading in several stages/layers can help you avoid such issues as you can gradually tweak how dark the various parts of the drawing are in relation to one other.
Also do not get discouraged if things don’t come out right even if you follow all of the recommendations. Getting something as complex as the eyes to look realistic may take some time and practice.
For more similar tutorial also see:
- How to Draw Eye Expressions Step by Step
- How to Draw Different Nose Types
- How to Draw Different Types of Lips
- How to Draw a Smile Step by Step


