How to Draw a Muffin Step by Step
This tutorial shows how to draw and shade a muffin in eight steps with detailed examples and in depth instructions.
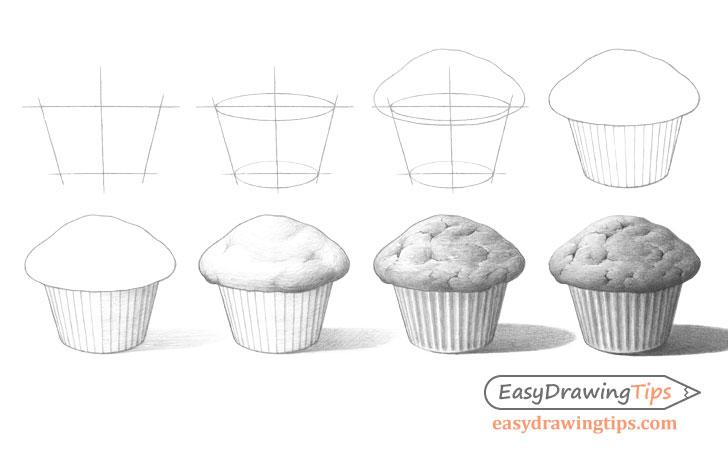
You can see a preview of the main stages of of the muffin drawing in the example above. The tutorial consists of a line drawing and a shading portion with easy to follow explanations for each step.
The drawing is best done in pencil but you can use a different medium if you prefer (such as a pen or charcoal).
Step 1 – Draw the Shape of the Base of the Muffin
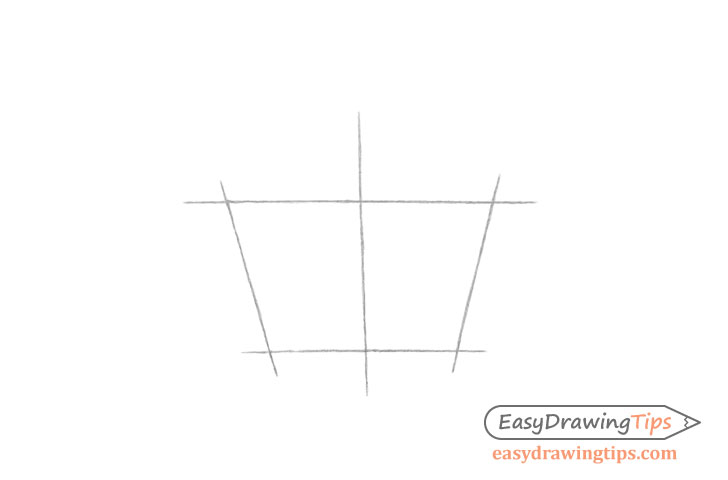
The goal of the first stage of the drawing is to get the objects overall shape, width and height. Begin by structuring the bottom part of the muffin. First, make a straight vertical line to act as a guide. This line can help you see if both halves of the muffin are relatively symmetrical. Next, define each of the sides as well as the top and bottom.
Be sure to make light lines for this part of the drawing as you will need to erase most of them later on. The lines in the example were made darker so that they are easier for you to see.
Step 2 – Draw the Top & Bottom of the Base
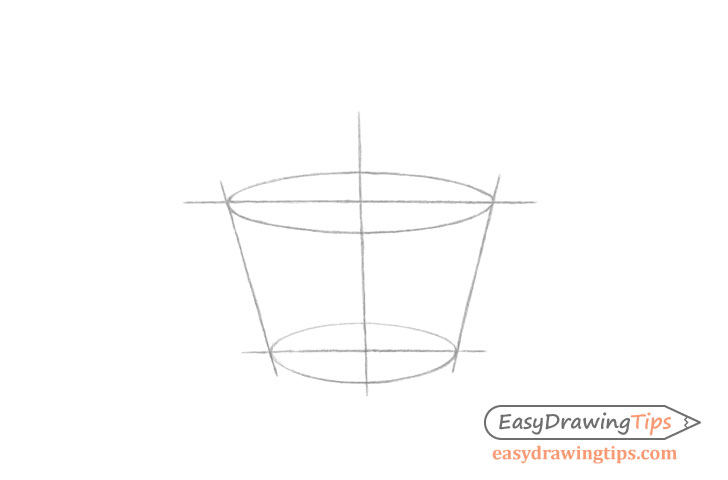
In this case the muffin is slightly below the level of the viewers eyes and thus is being viewed on an angle. In such a setup if you were to take the cap off of the muffin the top of it’s base would look like an oval, the same goes for the bottom (if you could look at the muffin as though it’s transparent). Also, because the bottom is lower down it would appear slightly rounder (closer to a circle) than the top. Keep this in mind and draw the top and bottom of the base of the muffin as shown above. Once done you should have something that looks a bit like a transparent bucket (though not as tall).
Again, be sure to make light lines for this step of the drawing.
Step 3 – Draw the Cap
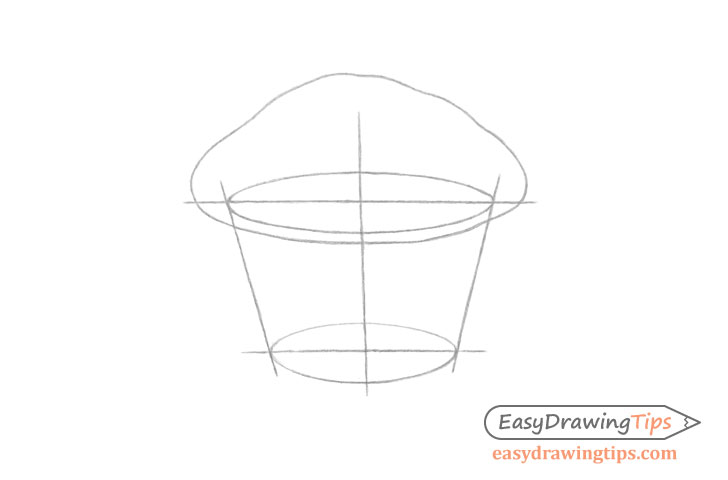
On top of the base add the muffin cap (as shown in the example). You can use the upper part of the base as a guide for getting the curve of the cap’s bottom.
Once you’ve outlined the top part of the muffin erase the guide lines as well as the areas that should be hidden. Afterwards, darken your lines by tracing over them.
Step 4 – Space out the Paper Folds
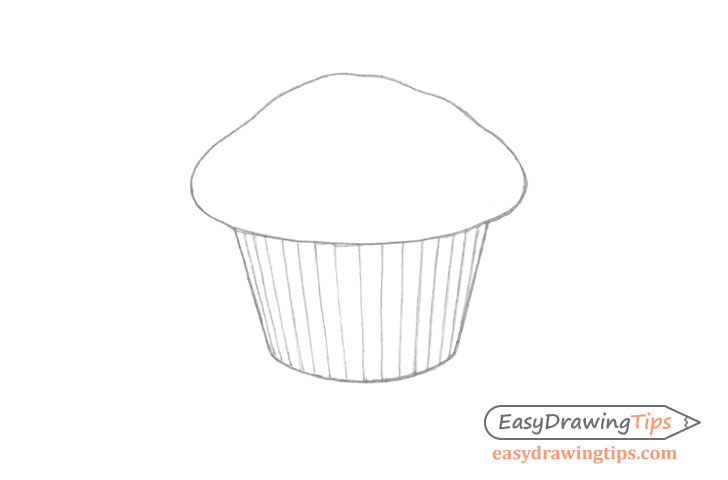
Space out the folds in the paper that covers the lower part of the muffin. Do this by making a series of lines that are farther apart near the center and closer together near the sides (due to the curvature of the muffin).
Keep these lines light as you want them to eventually blend into the shading.
Step 5 – Shade the Bottom

In this example the light is coming from the upper left of the muffin. This means that the darker areas as well as the shadow will be on the right (opposite the light source).
Being shading by applying a layer of strokes that curves around the muffin’s base (to help reinforce it’s shape). Next, add the shadow with linear strokes that run in one direction.
Be sure to keep this initial layer of shading fairly light in comparison to what you wish to have in the final drawing. You want to build things up gradually and start with the darker areas of the object.
For more on different stroke types and shading techniques see:
Shading Techniques and Stroke Types Drawing Tutorial
Step 6 – Shade the Top
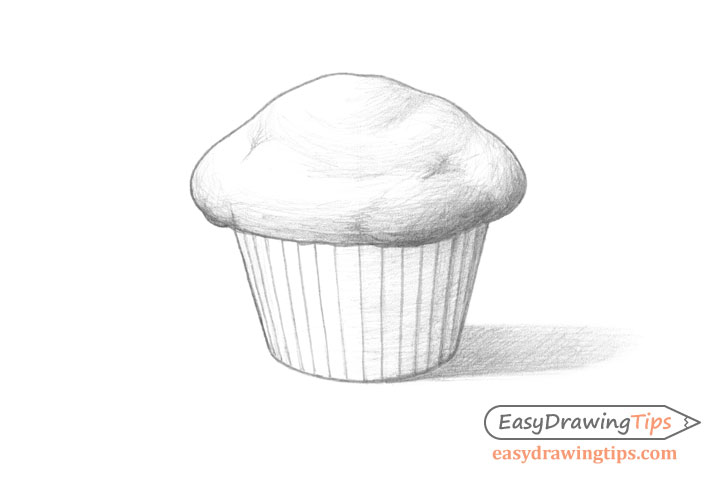
Add shading to the cap by once again applying the strokes where they somewhat run along it’s shape (including the larger bumps and curves).
You can also apply a second set of strokes to the shadow running in a different direction.
Step 7 – Add the Smaller Details Using Light & Dark
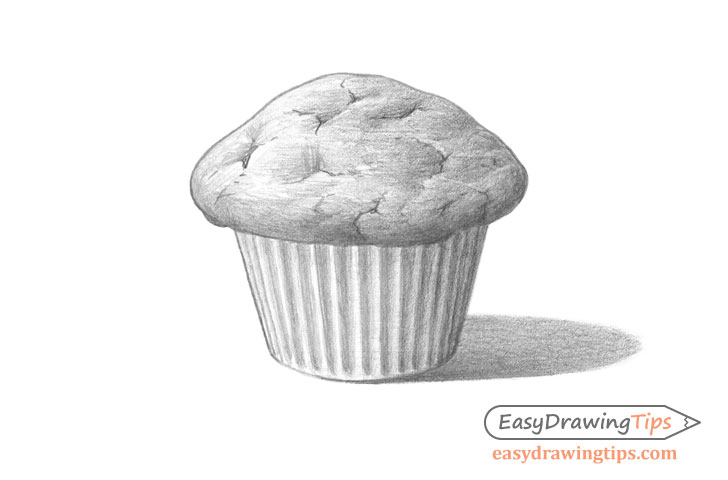
With the initial shading in place you can begin adding more layers of strokes to the drawing to bring it close to what you wish to have in the final result. You will also want to use light and dark to define the smaller details of the muffin such as the cracks along the cap and to create the three dimensional folds in the paper (as shown in the example).
For example, the cracks themselves will be very dark while the indented areas around them will be darker on the sides facing away from the light and lighter on the sides facing towards it. These should also respect the overall shading of the muffin. Meaning that the shadows on it’s left side should still be lighter than those on the right.
Similarly, the folds should also be lighter on the sides facing towards the light and darker on the sides facing away while generally getting darker as they move towards the “in shadow” side of the object (in this case they right side of the muffin).
Step 8 – Finish the Muffin Drawing
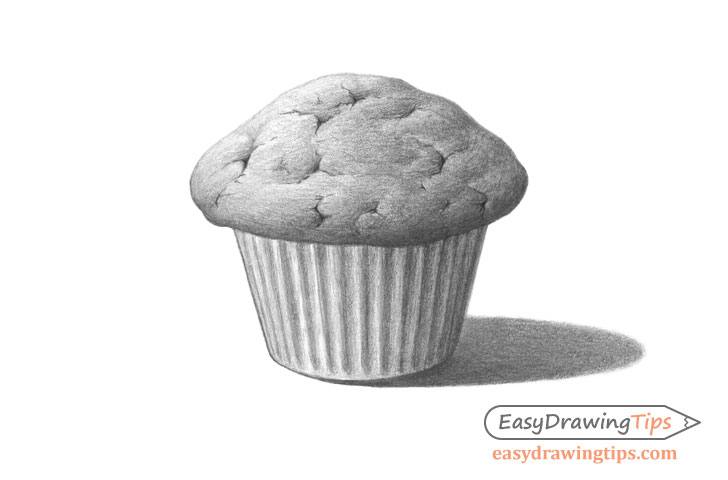
Apply even more layers of strokes to smooth out and darker the shading to the level you wish to have in the finished drawing. You can blends the strokes along the shadow to be practically invisible. However, don’t fully blend them along the muffin. As already mentioned before, the directions of the strokes can help reinforce the shape of the object.
Conclusion
This tutorial shows how you can go from from simple structure lines to a fully shaded realistic looking drawing of a muffin. By using a step by step approach and building this up gradually you can reduce mistakes and the amount of backtracking needed to correct them.
If you like these kinds of detailed but easy to follow explanations also be sure to try some of the following:
- How to Draw a Cake Slice in 10 Steps
- How to Shade Basic 3D Shapes Tutorial
- How to Draw a Croissant Step by Step
- Egg Step by Step Basic Shading Tutorial
- How to Draw a Fish in 10 Steps (Perch)


