How to Draw Male Hair Step by Step
This tutorial shows how to draw male hair in different hairstyles. Each haircut includes step by step pencil drawing examples and detailed explanations.
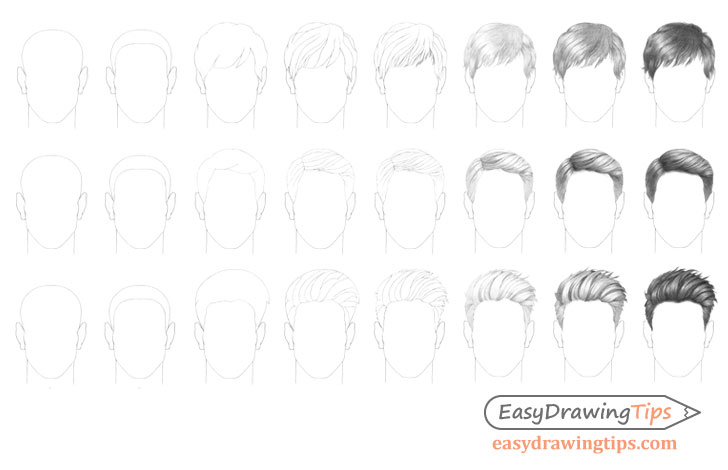
The hairstyle drawing examples examples include:
- Natural Looking Hair
- Combed Hair
- Spiky Hair
Be sure to make light pencil strokes for the line drawing portion of each hairstyle as you will want these lines to eventually blend into the shading. The examples have been made slightly darker so that they are easier to see.
Also please note that it is recommended that you read over the drawing instructions of the first hair example even if you plan on drawing one of the other hairstyles. It has the most detailed explanation with the others going into slightly less details to avoid repetition.
How to Draw Natural Male Hair Step by Step

This first example is for drawing fairly natural looking slightly messy hair.
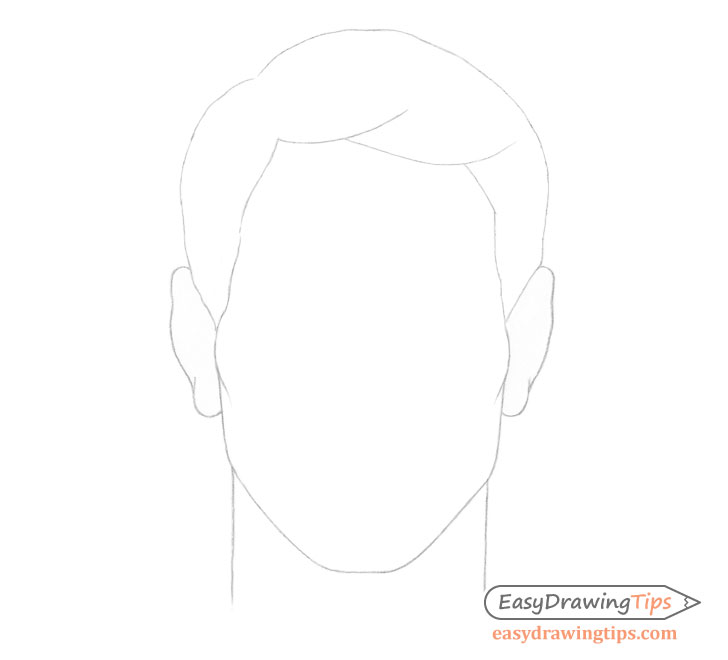
Step 1 – Draw the Head

Star by making a simple outline drawing of the head without the hair. Doing so will later help you better estimate the volume that the hair should have. It can also help you avoid making mistakes when drawing.
Please note that as the focus of this tutorial is on the hair we will not go into drawing the facial features.
For the proportions of drawing a male face see:
How to Draw a Male Face Step by Step Tutorial
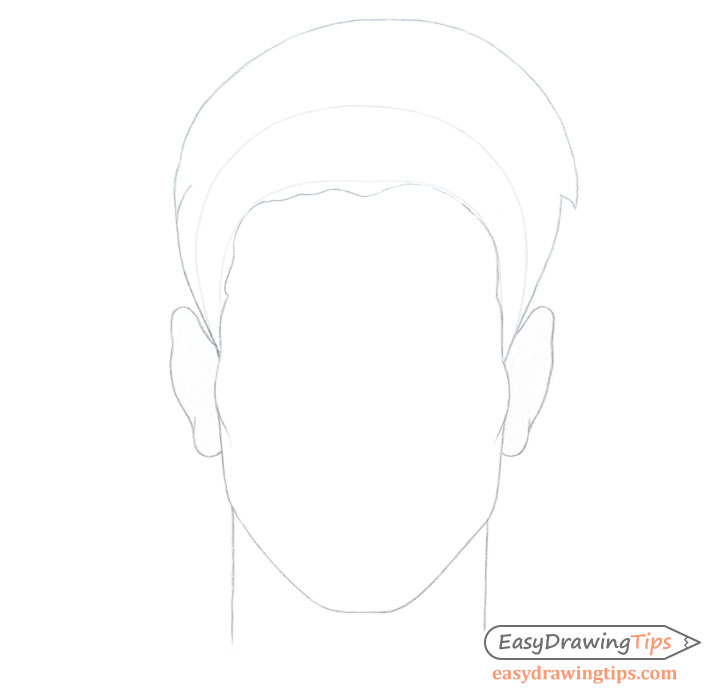
Step 2 – Draw the Hairline
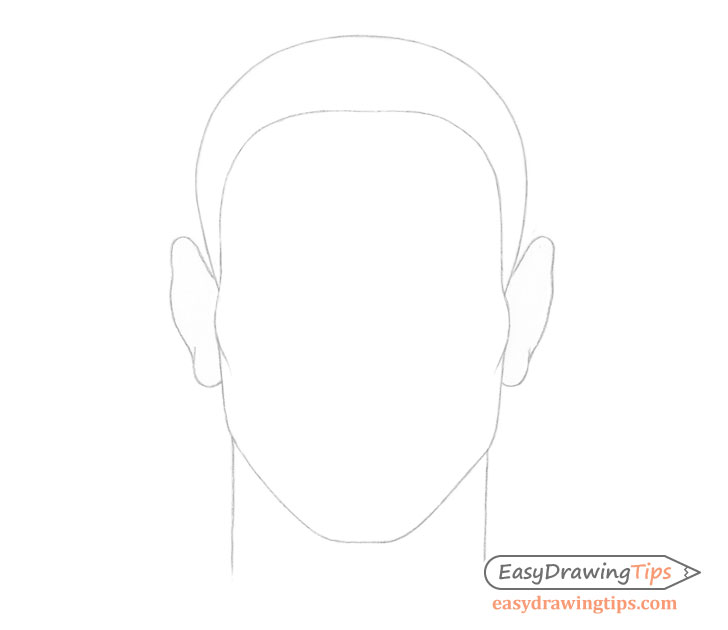
After drawing the head draw a guide line for the hairline as shown in the example above.
This line will help you better estimate how far up the various splits in the hair clumps (added in the next step) should go.
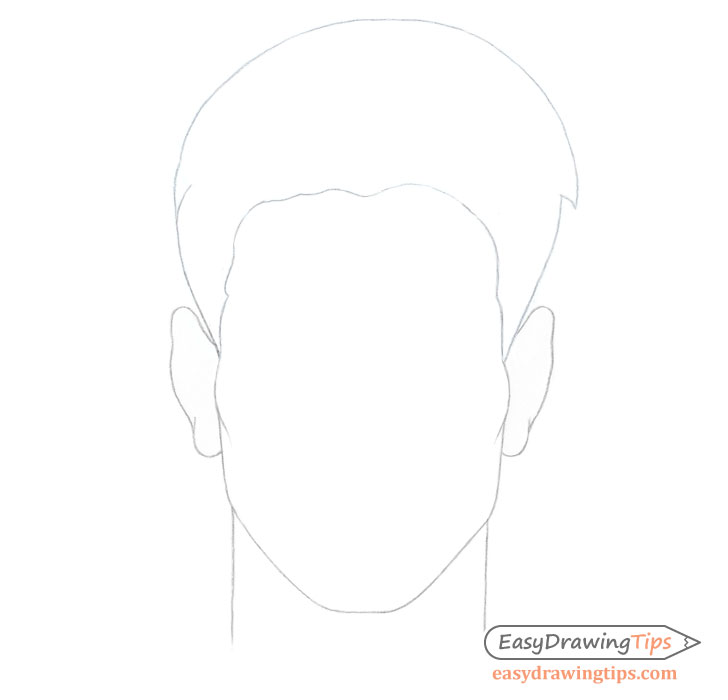
Step 3 – Draw an Outline of the Hair
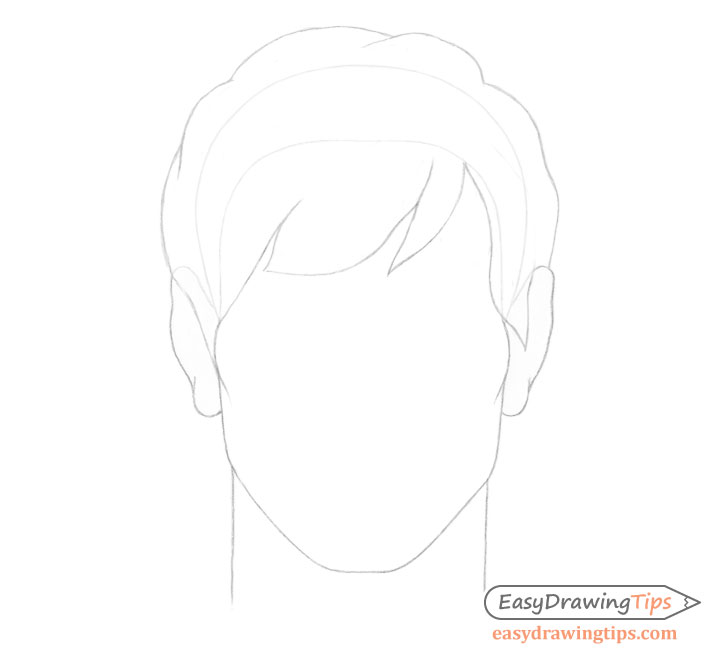
Over the top of the head and hairline draw the outline of the hair. For this step leave out all of the small splits and folds and instead draw the larger main shapes that define this particular hairstyle.

Erase the parts of the head covered by the hair after you are done with this step.
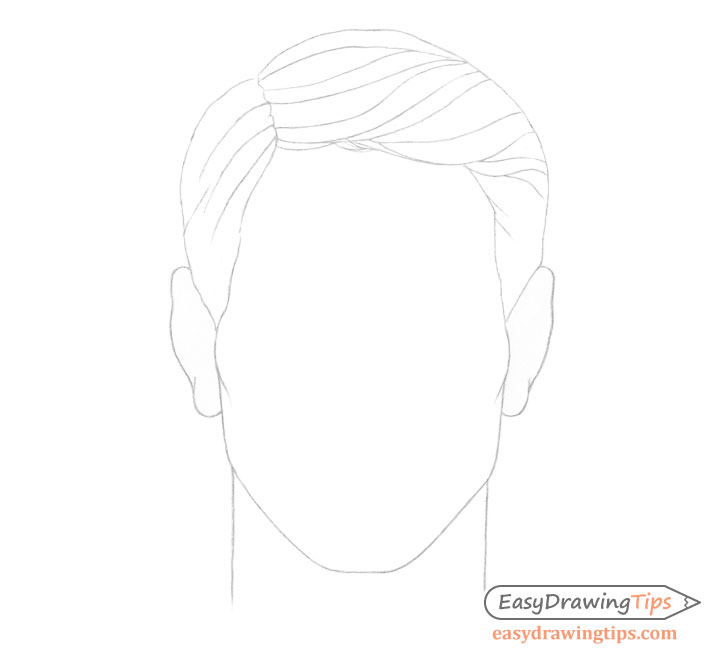
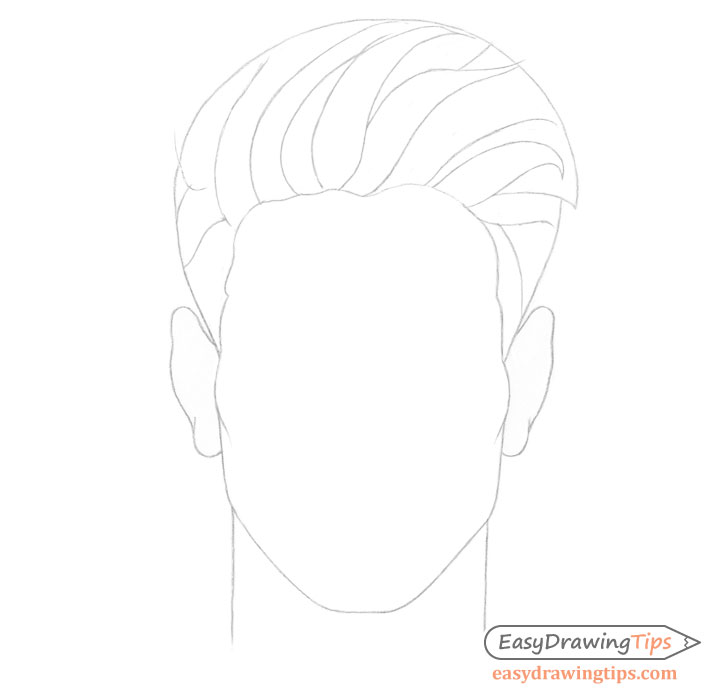
Step 4 – Add Some Details

Begin adding the larger details and folds into the hair splitting it up into its various smaller clumps.
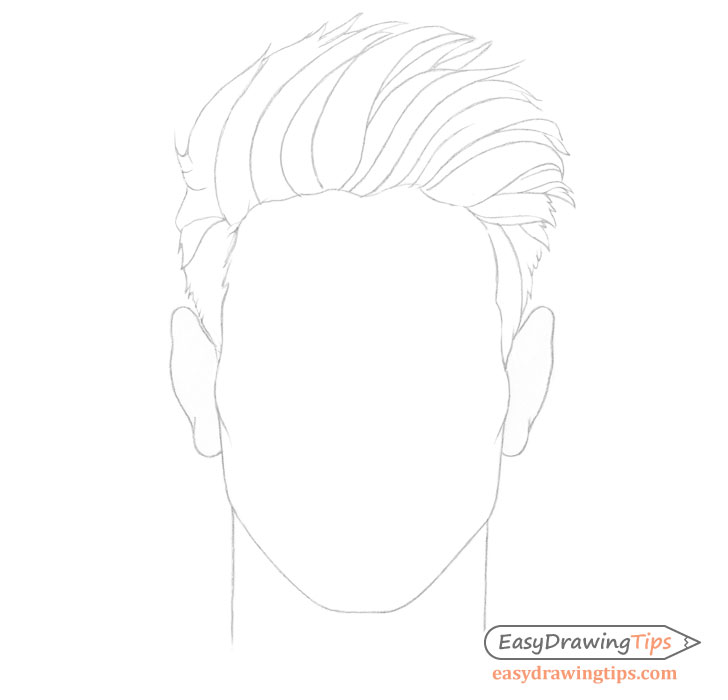
Step 5 – Finish the Line Drawing
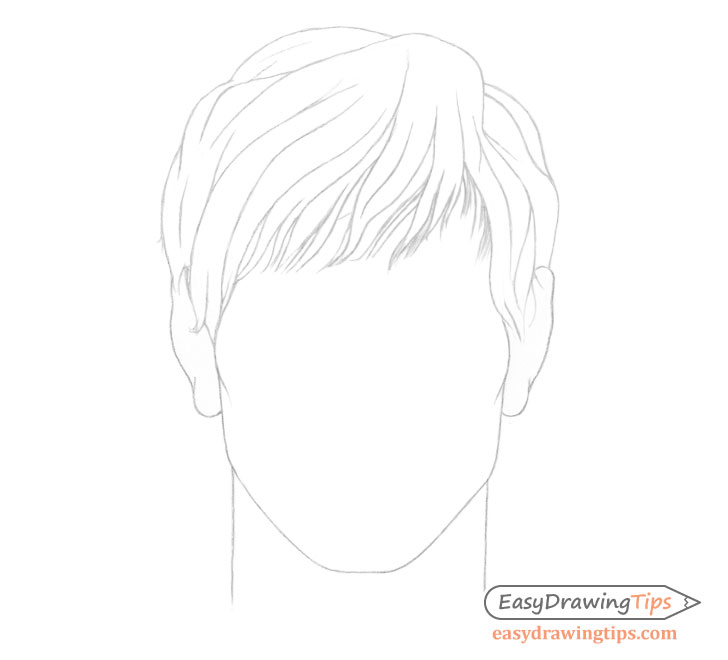
Add the next set of details such as the smaller waves in the hair as well as some hints of the individual hairs on the end of the hair clumps to finish the line drawing portion of the hairstyle.
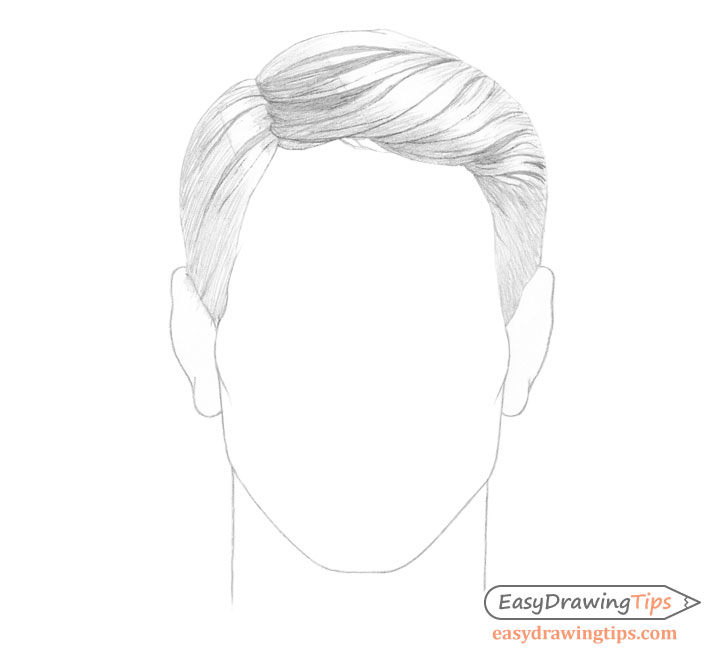
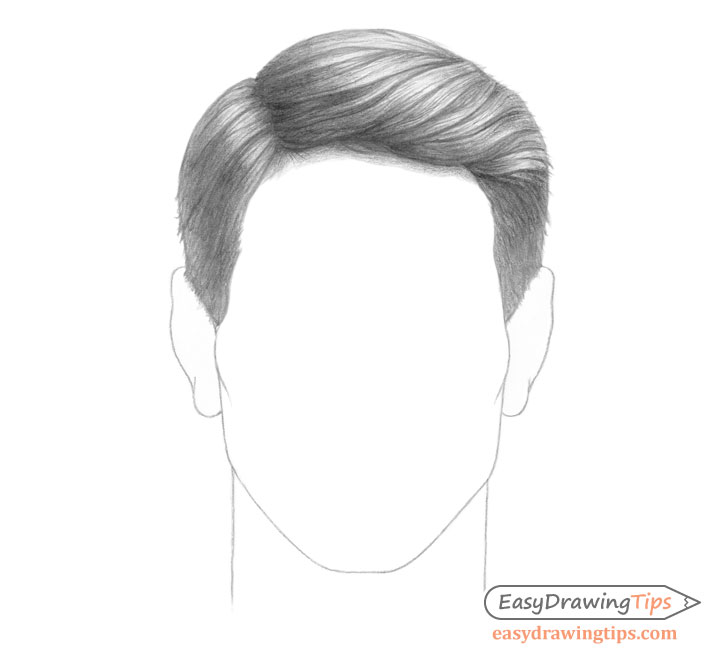
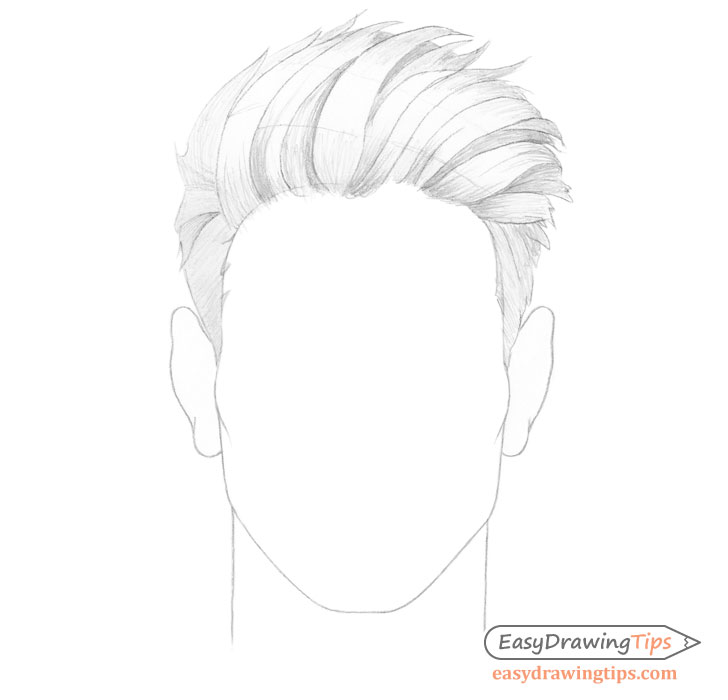
Step 6 – Begin Applying Shading
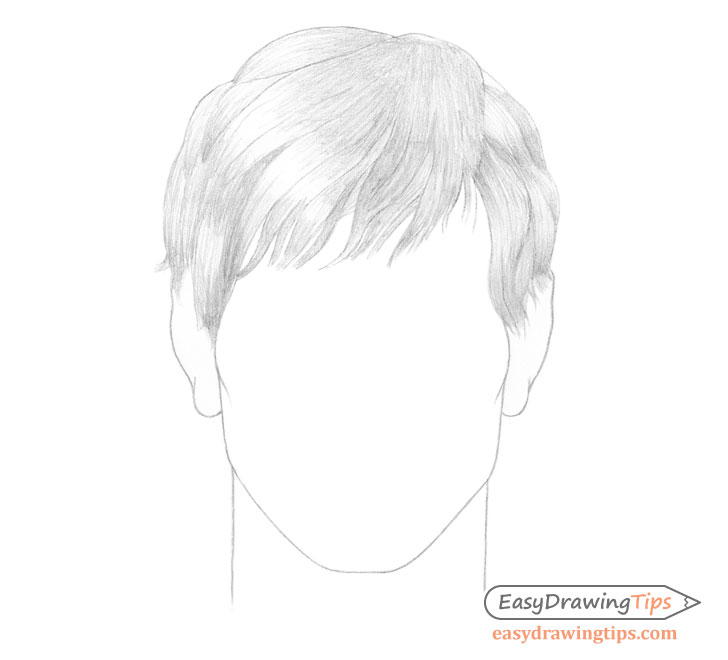
For shading this example we will use fairly generic lighting conditions with no strong one directional light source.
To begin shading make light strokes that flow along the various hair clumps. Try to not have too many overlapping lines and don’t completely blend all of them together. You want the pencil lines in the mid tone areas (light grey parts that are not highlights or shadows) to be somewhat visible in order to create an appearance of individual hairs.
Leave the highlight areas (brightest parts) of the hair completely white and make the strokes for the darker in shadow areas slightly darker. The goal of this step is to create a shading guide for yourself by establishing the general flow of the strokes and the light, dark and mid tone areas.
Step 7 – Intensify the Shading

Once you finish the initial layer of light strokes you can begin to darker the shading by applying additional layers of strokes over top of them.
The reason for applying shading gradually instead of juts going full strength right away is that you will be less likely to make mistakes and if you do make them they will be easier to fix.
For example if you start shading the mid tone areas right away you may then find that the you’ve made the shading too dark in relation to the “in shadow” areas and you may no longer be able to make dark enough lines to show the correct contrast between the two. If you apply the shading gradually you will be able to slightly tweak the darkness of each area as needed until you have the right balance. If you catch your mistakes early on while your strokes are fairly light they will also simply be easier to erase.
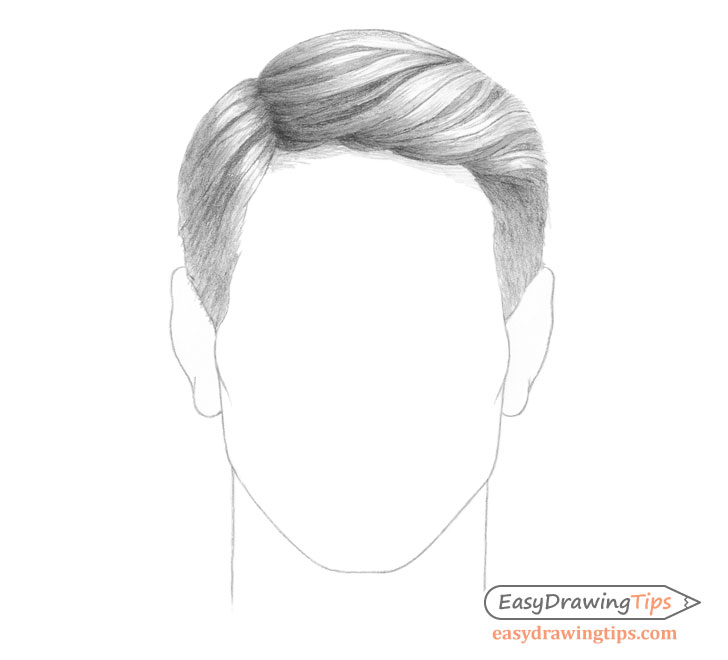
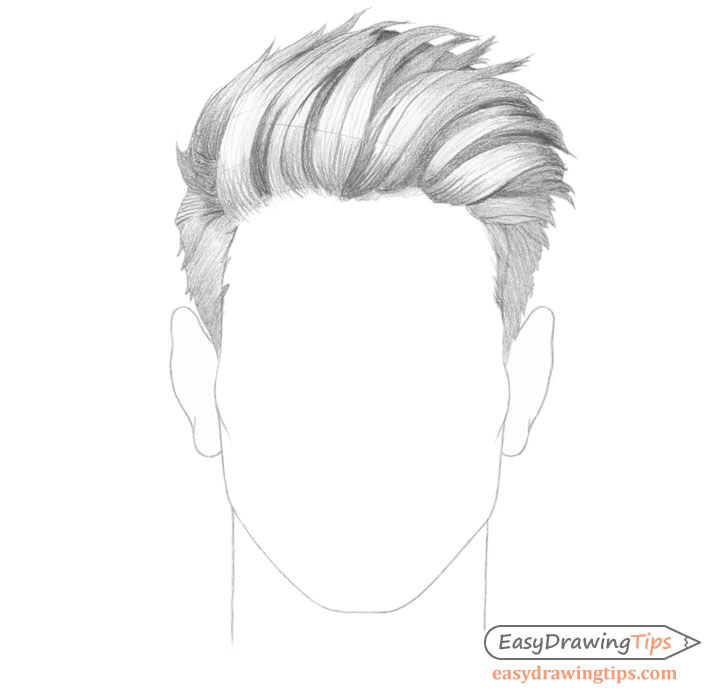
Step 8 – Finish the Hair Drawing
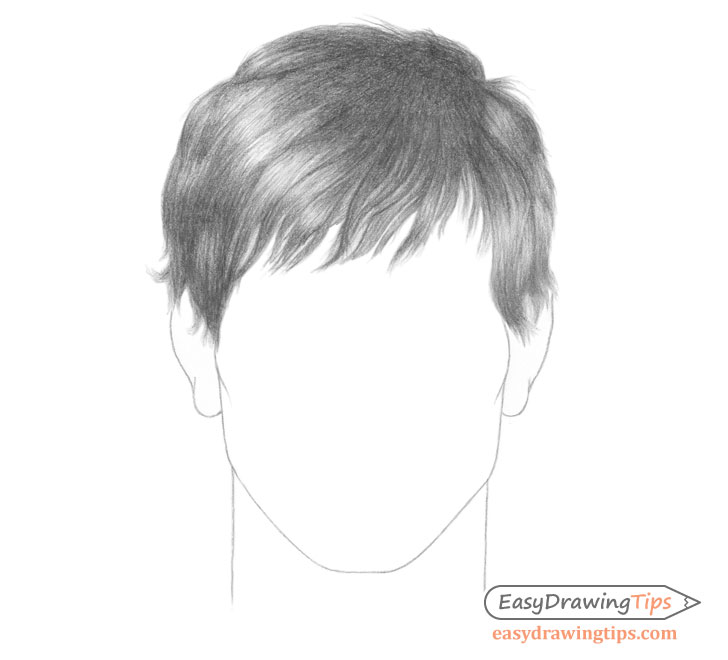
Keep on going over your drawing with multiple layer of stroke slowly darkening the hair.
Once you are almost finished you can make some quick stroke around the tips of the hair to give hints of individual hairs sticking out.
Make these by first applying more pressure to the pencil and then quickly pulling your hand away from the paper as you draw each one. This will give each stroke a nice light to dark transition and create soft looking hair like ends.
How to Draw Combed Male Hair Step by Step
This example is of drawing neatly combed hair.
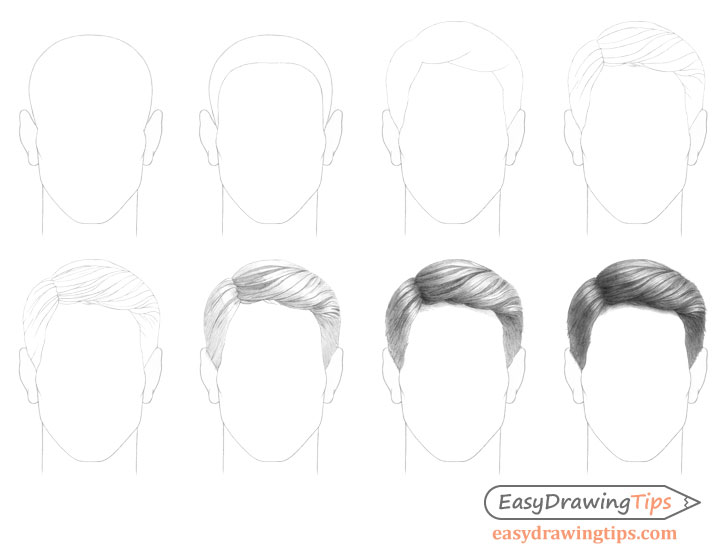
Step 1 – Draw the Head
Same as the previous example start by drawing the basic outline of the head without any of the hair.
Step 2 – Draw the Hairline
Add the guide line for the hairline as shown in the example above.
Step 3 – Draw an Outline of the Hair
Over top of the head and hairline guide draw a basic outline of the actual hair without any of the smaller details.
As the hair is combed back it will reveal a large portion of the hairline making the guideline for it particularly useful. To keep the hair looking natural you ca make large parts of it overlap the guide line but at the same time still try and somewhat follow its general shape.
Erase the hairline guide line and the parts of the head covered by the hair after you are done with this step.
Step 4 – Add Some Details
Into the main outline drawing of the hair begin adding some of it’s larger inner waves/folds.
Step 5 – Finish the Line Drawing
Finish the line drawing by adding the smallest detail of the various folds and curves.
Step 6 – Begin Applying Shading
Same as the previous example we will shade this hairstyle as though it’s in fairly generic lighting conditions with no strong one direction lighting.
Begin by applying fairly light strokes that flow along the various folds of the hair. Once again the purpose of this step is to establish the overall direction of the pencil strokes as well as the locations of the main highlights (bright areas), shadows and mid tones (general grey area).
Step 7 – Intensify the Shading
Begin darkening and smoothing out the shading by applying another layer of strokes. Make this layer slightly darker than the previous. Again the reason for applying the shading gradually is to help avoid potential mistakes. You can see the same step of the previous example for a more detailed explanation of this.
Step 8 – Finish the Hair Drawing
Darken the shading even further by applying more layer of strokes. Once nearly done you can again draw some tiny lines sticking out of the main shape of the hair to give an appearance of individual hair. This will make the drawing look more realistic.
To make these short strokes first apply stronger pressure to the pencil and then quickly pull your hand away from the paper.
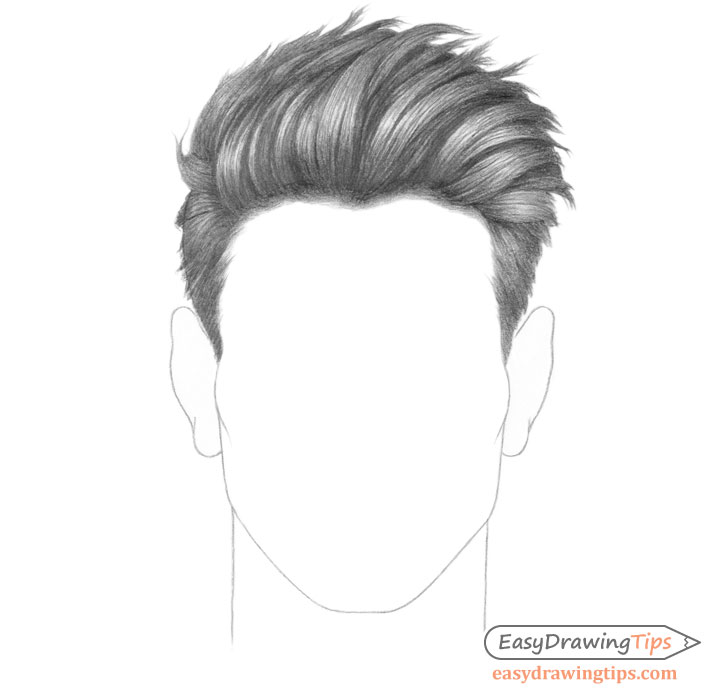
How to Draw Spiky Male Hair Step by Step

This last example is of drawing spiky hair combed upwards. Usually a style like this requires hair gel which makes the hair stick together into fairly large clumps. So we will draw accordingly.
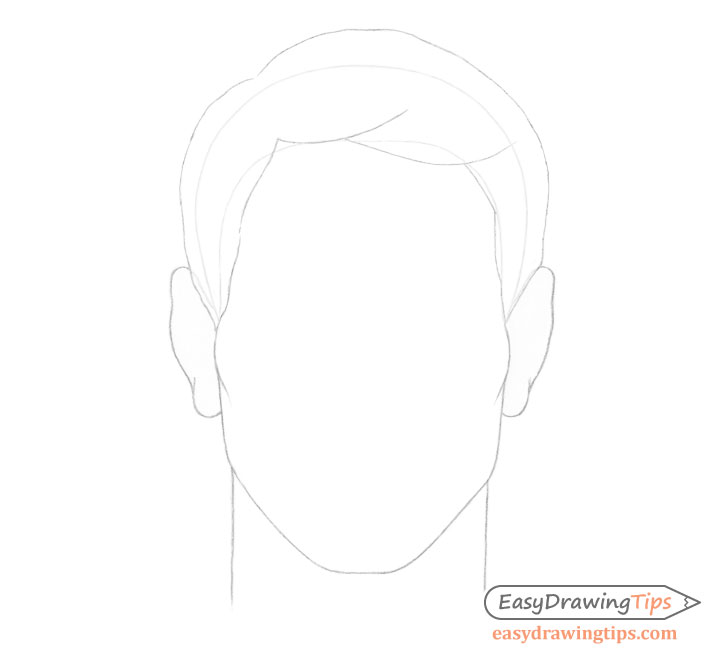
Step 1 – Draw the Head
Once again draw a basic outline of the head before drawing the hair.
Step 2 – Draw the Hairline
Add the guide line for the hairline same as as for the other hairstyles. As this example reveals pretty much all of the hairline this step is particularly important.
Step 3 – Draw an Outline of the Hair
Over top of the head and hairline guide add the main outline of the hair. To make the actual hairline look more natural you can make it more wavy and not as perfectly symmetrical as it’s guide line.
For this step you can pretty much draw the top portion of the hair as a simplified silhouette without any of the details of the individual hair clumps.
Erase the hairline guide and parts of the head covered by the hair once you are done with this step.
Step 4 – Add Some Details
Into the main outline of the hair draw the lines that split the individual hair clumps. In this case the overall flow of the hair will be to the right side of the drawing.
Step 5 – Finish the Line Drawing
Add the pointy ends of the hair clumps and erase parts of the hair outline drawing from earlier steps as needed.
Step 6 – Begin Applying Shading
Same as the other two example this one will also use fairly generic lighting conditions with no strong one directional light source.
Being applying light shading by making strokes that flow along the general direction of each hair clump. Leave the highlight areas (brightest parts) of the hair white and make the in shadow areas slightly darker.
Again the goal of this step is to make a shading guide that you can can then refine into a more realistic drawing of the hair. For a more detailed explanation see the same step of the first example of this tutorial.
Step 7 – Intensify the Shading
Apply another layer of strokes to the drawing following their overall flow created in the previous step.
Try and keep the strokes fairly visible without too much blending, especially in the mid tone areas (medium grey parts of the hair) but at the same time also try and create smooth transitions between the light and dark areas of the hair.
The visible strokes will help make the shading look like individual hairs.
Step 8 – Finish the Hair Drawing
Darken the hair even further and once finished again add some small strokes along its edges to give hints of the individual hairs sticking out in slightly different directions.
Again to make these first press slightly harder on the pencil and then pull your hand away from the paper towards the ends. This will create light hair like tips.
Conclusion
Drawing hair can be a little bit tricky but by applying the step by step instructions used in this tutorial you can make the process a little less confusing. Whatever hairstyle you want to draw start with a rough drawing of the main shape of the hair and then work your way down to the smaller details. When applying shading try to do it gradually in several layers of strokes.
By creating your overall drawing gradually in several steps you will be less likely to make a mistake and will have to do less backtracking in case you do.
For drawing female hair see:
How to Draw Hair Step by Step Tutorial
For more general drawing tips and good practices see:
Beginner Guide to Learning to Draw


