Egg Step by Step Basic Shading Tutorial
This tutorial explains the basics of shading using an egg with a simple surface and background. It also shows a practical application of different types of pencil strokes and can be particularly helpful for beginner artists.

For an explanation of the different types of strokes used in this tutorial see:
Shading Techniques and Stroke Types
Step 1 – Outline the Shape of the Egg

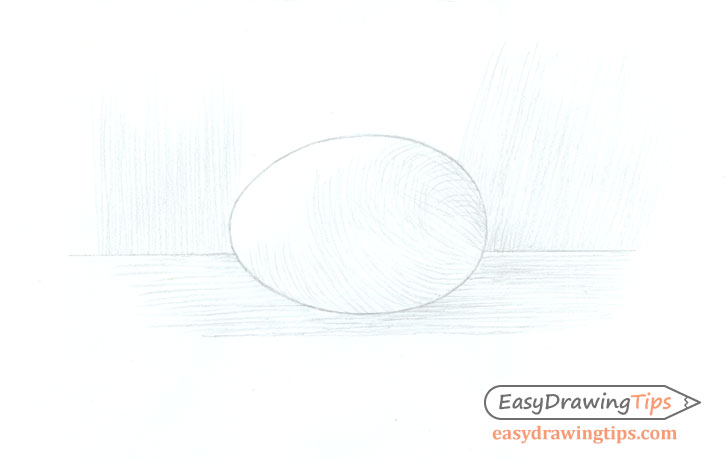
The egg is a very basic shape so there is not much to do in the initial step. Simply draw it’s outer shape similar to an oval where one end is pointier then the other. You can also add a straight horizontal line to indicate the edge of the surface it’s sitting on.
Step 2 – Determine the Light & Dark Areas
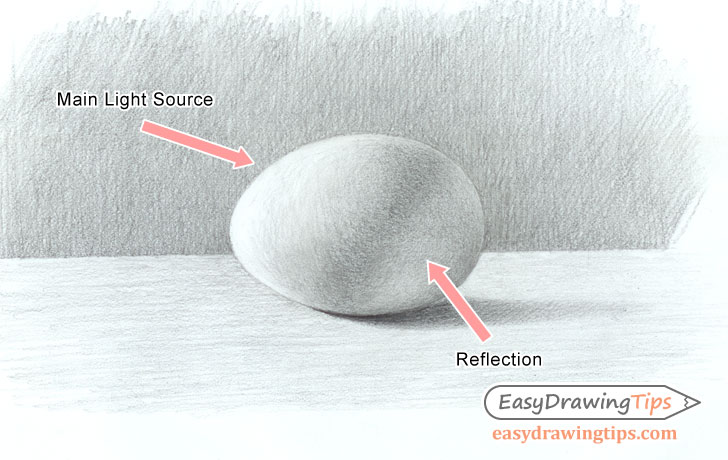
As you can see based on the finished drawing the light will be coming from the upper left. This means that the upper left side of the egg will be it’s lightest area. The egg will get darker towards the right as it’s surface curves away from the main light source.
You will also notice that a little bit past the middle it once again becomes lighter. This is due to the reflection of the main light source from the surface the egg is sitting on illuminating it’s bottom right side. However this area will not be as bright as that lit up by the main light source.
The egg will also cast a shadow to it’s right (directly opposite the main light source). The base of this shadow will be the darkest area of the drawing. As the shadow moves away from the egg it will become lighter and more blurred.
Keeping all of these things in mind you can move to the actual process of shading the egg.
Step 3 – Determine the Direction of the Shading Strokes
The strokes in the above example show the general directions and stroke types which you will want to shade the different parts of the drawing.
In this case we will use curved strokes for shading the egg, straight one directional strokes for shading the surface it’s sitting on and straight cross hatch strokes for the background.
You can see the two different directions of the background strokes on each side of the drawing. These will overlap to create the crosshatch. Please note that this is simply shown to make the shading process easier to understand. When you are shading your drawing you can first fully cover the background with one set of strokes and apply the second set afterwards.
Step 4 – Shade Each Surface Area

Fully shade your drawing applying the strokes in the directions described above. Once you pretty much fill in the table/surface area the egg is on top of you can add a darker set of straight crosshatch strokes to create the shadow. Make the first set along it’s general direction and the second slightly angled in relation to the first one.
Step 5 – Refine the Shading & Finish the Drawing

Finish the drawing by applying more strokes to each area to somewhat fill the gaps between them. You will also want to gradually darken the in shadow areas and create smoother transitions from light to dark. For the egg itself you can blend the strokes to the point of barely visible to show that it has a smooth surface. As the egg is the subject of the drawing it’s also generally a good idea to develop it slightly more than it’s background.
When it comes to the shadow you can fully blend the strokes to the point of invisible and carefully blur it’s edges. As mentioned earlier the shadow should become lighter and more blurry the further it moves away form the objects (the egg).
You can darken both the background and the surface areas but try and do it in a way where the egg sands out from both. If you look at the example you can see that the background area is generally darker than the surface of the egg. You can also leave a tiny white edge around the darker areas of the egg to make sure that it does not blend into it’s surroundings.
Also in the example the table/surface area is darker then the light side of the egg and lighter than it’s dark side. With the really dark shadow between there are no issues of the egg blending into the surface area either.
Conclusion
Drawing an egg along with a basic surface and background may seem fairly simple but there is still quite a bit to know if you want to create a realistic looking drawing. Hopefully this tutorial helped you gain a better understand of applying different types of pencil strokes as well as shading in general.
For more on shading simple objects see:
Drawing & Shading Basic 3d Shapes Tutorial


