How to Draw a Croissant Step by Step
This tutorial shows how to draw a realistic looking croissant (in pencil). The examples go from basic construction lines to a fully shaded drawing.
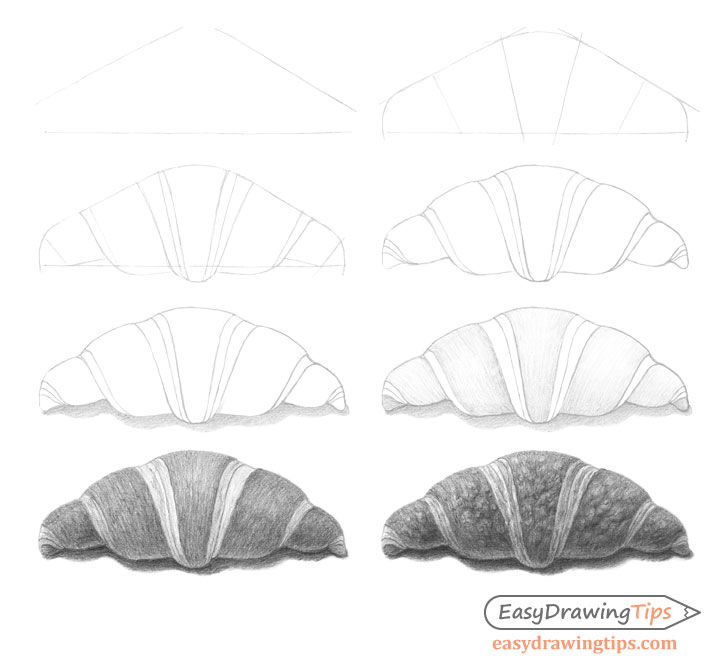
The tutorial consists of a total of eight steps. You can see a preview of each of these in the image above.
As in the examples it’s recommended that you draw using a pencil and make very light line for the initial steps. This will make it easier to clean up the construction lines and to correct any potential mistakes.
Step 1 – Make a Construction Drawing of the Croissant

Begin the drawing with a few simple construction lines that define the main shape of the croissant.
Being view from the angle in the example (side view slightly below the eye level) the shape of the croissant will somewhat resemble a triangle. You can therefore define it with just three straight lines as shown above.
For more on “eye level” see:
Perspective Drawing Tutorial for Beginners
The reason for this approach (as with many other tutorials here on EasyDrawingTips) is to avoid excessive backtracking in case you make a mistake. If you start by going into the smaller details such as the different bends and curves right away you may find that by the time you outline all of them the overall shape of the croissant will be off (it can be too short, too long, too tall, etc…). This can mean having to erase a large part of or even the entire drawing and undoing all that work.
However, if you create a simple framework to first establish the correct overall shape of the object you can then work within that without having to worry. If you happen to not get the construction lines right on the first try redrawing them can be done fairly quickly an easily.
Step 2 – Proportion the Different Sections

Close off the openings in the previous shape with a few curves to further define the croissant’s shape. Afterwards use another set of straight lines to define it’s different sections. Once again the idea is the same as the above. Get the next basic set of proportions before moving onto the more organic outline of the object.
Step 3 – Outline the Shape
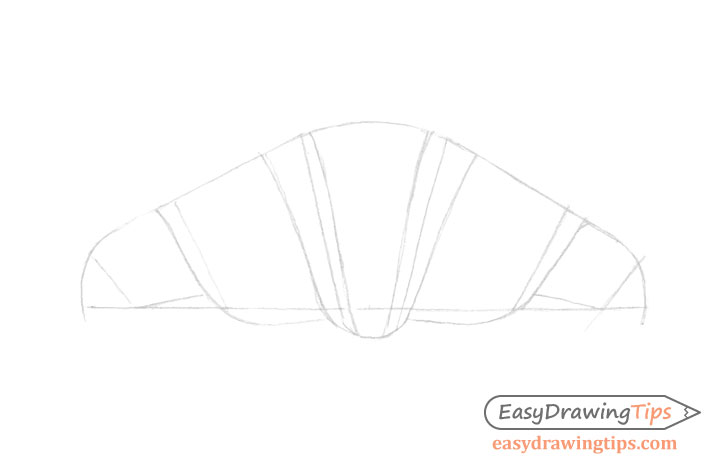
Within the frame of the construction drawing start outlining it’s organic shape by adding the various bends and curves.
Step 4 – Finish the Line Drawing

Once you feel that things look right clean up the drawing by erasing the construction lines. You should then have something similar to the above.
Step 5 – Add the Shadow
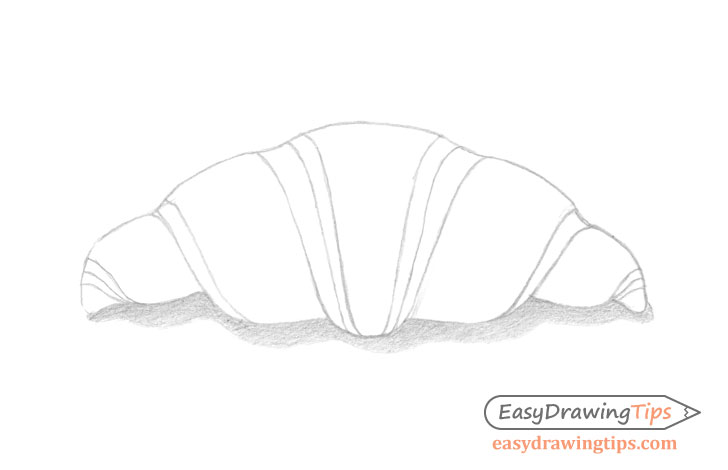
The next major stage of the drawing process is adding the shading. You can start this by creating a shadow underneath the croissant. Doing so will make it appear as though it’s actually sitting on a surface instead of looking like it’s floating in the air.
In this particular setup the light will be coming from above and slightly to the front of the croissant so the shadow will be fairly short and directly below it.
The shape of the shadow should somewhat trace the bottom shape of the croissant. It should also be darker towards it and lighter as it moves away from the object.
For this stage of the drawing don’t yet go full strength with the shading but instead make the shadow lighter than what you wish to have a in the finished drawing.
For different stroke types and shading methods see the following:
Shading Techniques and Stroke Types Drawing Tutorial
You can use the “crosshatch” or blending methods for the shadow.
Step 6 – Start Shading

After adding the shadow shade the croissant itself. Try and place the strokes as in the example where they flow along the shape of each of it’s sections. This will help create the type of texture that croissants tend to have.
As was already mentioned, in this case the light is coming from above and slightly to the front so the croissant will generally be darker on the the bottom, lighter as it goes up and then a little bit darker once again near the very top. Keep this in mind when shading. Also, once again, don’t yet go full strength with your strokes.
Step 7 – Darken the Shading
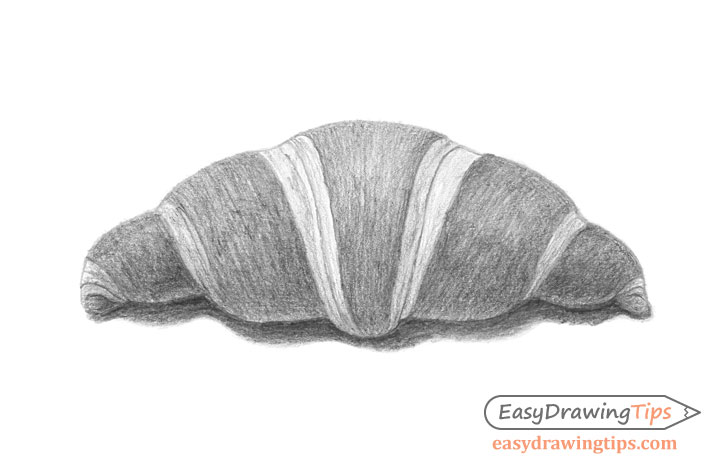
Once you have the basic distribution of the light and dark areas of the croissant you can then darker the shading from the previous steps and add some lighter shading to the “in between” section.
One other thing you will want to do in this stage of the drawing is leave a slightly lighter strip along the very bottom of the croissant that gradually transitions into the darker shading. This will generally be created by the light reflecting from the surface the croissant is sitting on.
When done darkening the shading you will pretty much have a finished drawing which you could leave at this stage. However, if you want to add a bit more detail you can move on to the next step.
Step 8 – Finish the Croissant Drawing
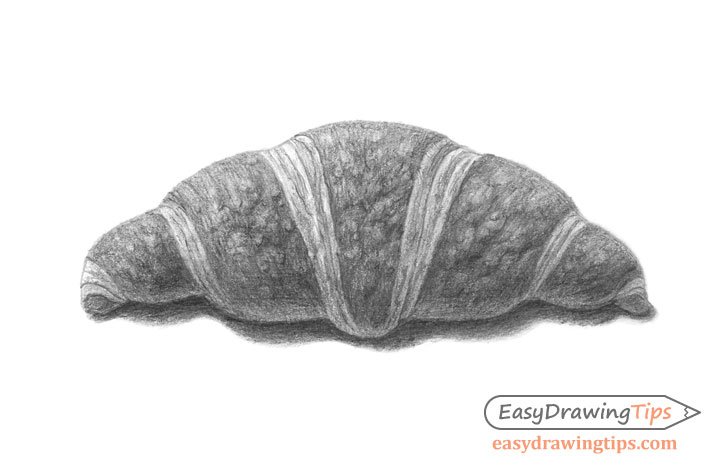
When croissant’s bake the dough at the top often tends to warp and bubble. Adding this into the drawing can be a bit tricky but will make it appear more realistic.
To create the effect of the warped dough you can first either use a kneaded eraser or the corner of a regular one to create some light spots of slightly varying size in the shading. You can then re-shaded each spot and blend it into the original shading to create the “bubble” effect. Generally you will want to darken the “bubbles” at the bottom and keep them lighter towards the top just like the croissant’s main shape. However, you don’t need to bee too accurate with this as the warps in the dough can create some fairly random shadows.
Conclusion
This tutorial explains how to properly structure the drawing of an object (in this case a croissant) and then how to give it some realistic looking shading. Overall the tutorial is not overly difficult especially since the last, more complex part is optional.
If you like these types of detailed step by step breakdowns of the drawing process you may also wish to try the following:
- How to Draw a Cake Slice in 10 Steps
- How to Shade Basic 3D Shapes Tutorial
- Egg Step by Step Basic Shading Tutorial
- How to Draw a Muffin Step by Step
- How to Draw a Realistic Pumpkin Step by Step Tutorial


