How to Draw an Eagle Head Step by Step
This tutorial shows how to draw the head of a bald eagle from the side view in twelve steps. It includes detailed illustrations and simple drawing instructions.
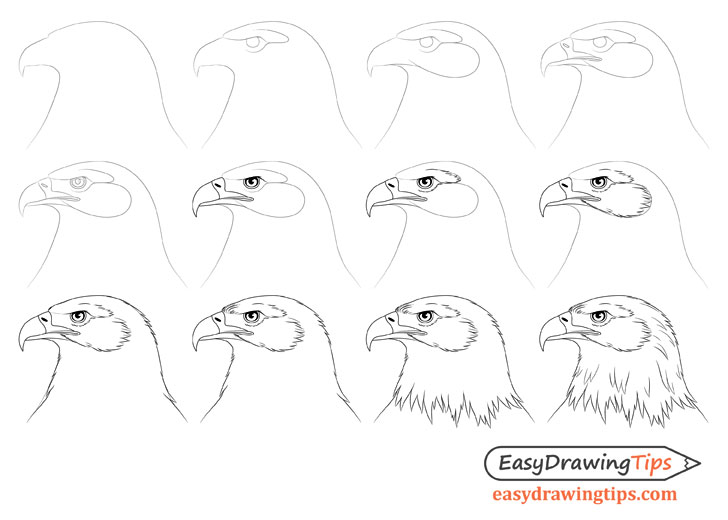
The examples show how you can take an eagle’s most characteristic features with a minimal amount of detail and create a fairly realistic looking line drawing. While animals can often be a challenge to draw, this is a reasonably beginner friend guide as it offers a detailed and easy to follow breakdown of the drawing process.
Start the tutorial in pencil and use light lines that you can easily erase. You will need to do so in some of the steps as you go through the different stages of the drawing. You can darken your lines after you’ve added all parts of the eagle’s head.
Step 1 – Draw an Outline of the Eagle’s Head
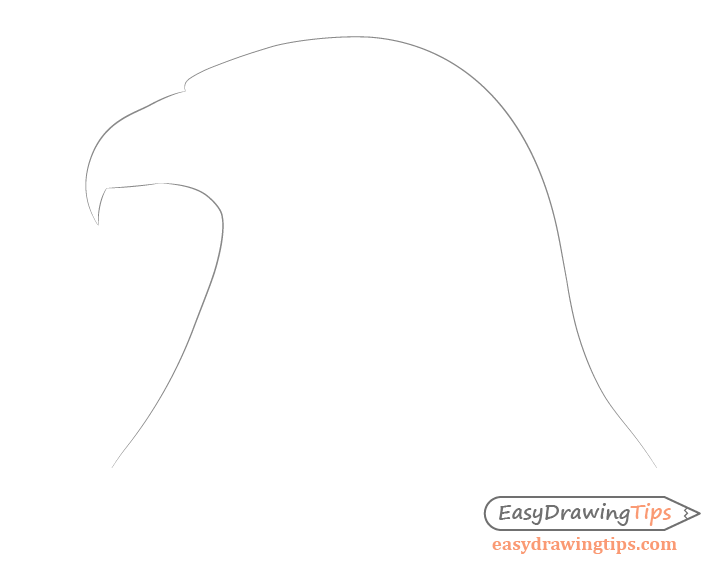
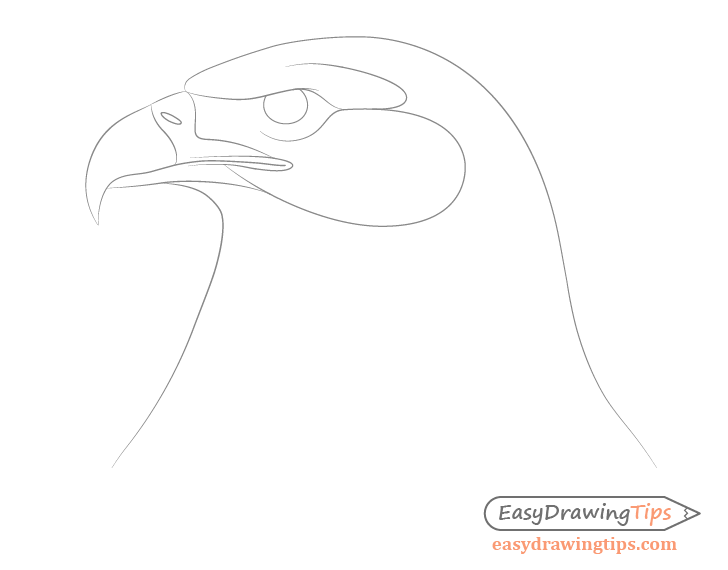
Start the drawing with a simple outline of the eagle’s head, basically a silhouette without any of the smaller details.
First, draw a fairly large beak with a hook like tip that is so characteristic of birds of prey. Afterwards, add outline the the shape of the head and neck. Define both the top and bottom of the head with smooth curves that transition into the neck which gets wider as it goes down.
For drawing a regular bird see:
How to Draw Bird Step by Step – Side View
Please be aware that you will need to erase parts of this outline later on so again, be sure to keep your lines light.
Step 2 – Draw the Eye & Surrounding Shapes
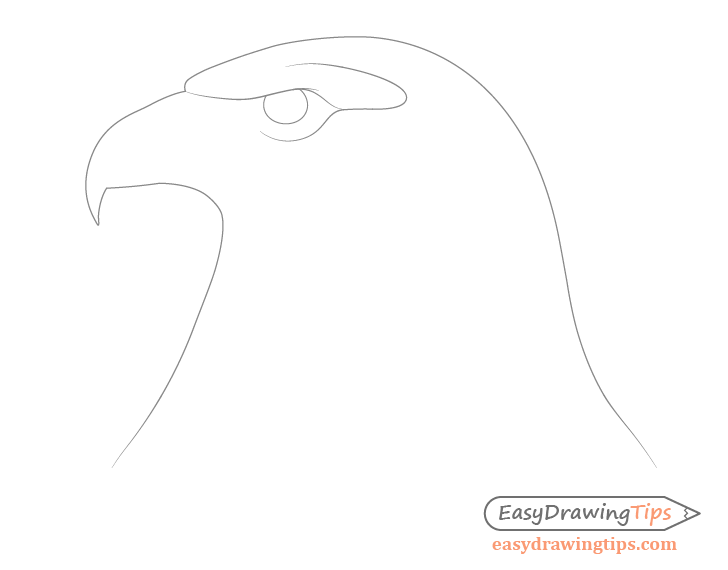
Draw the outline of the eagle’s eye as a circle or a light oval with it’s top portion lightly covered by the eyebrow. You can project the eyebrow line/forehead line from the area where the beak transitions into the head.
Afterwards, draw some lines to define the feather pattern above and below the eye as shown in the example. Please note that the actual feathers will be added in later steps. The purpose of these lines is to act as guides that can then be erased.
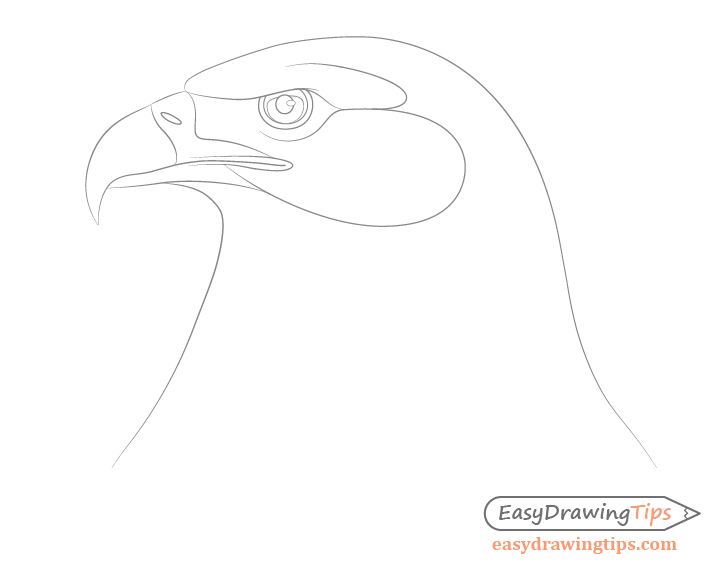
Step 3 – Draw the “Cheek” Area
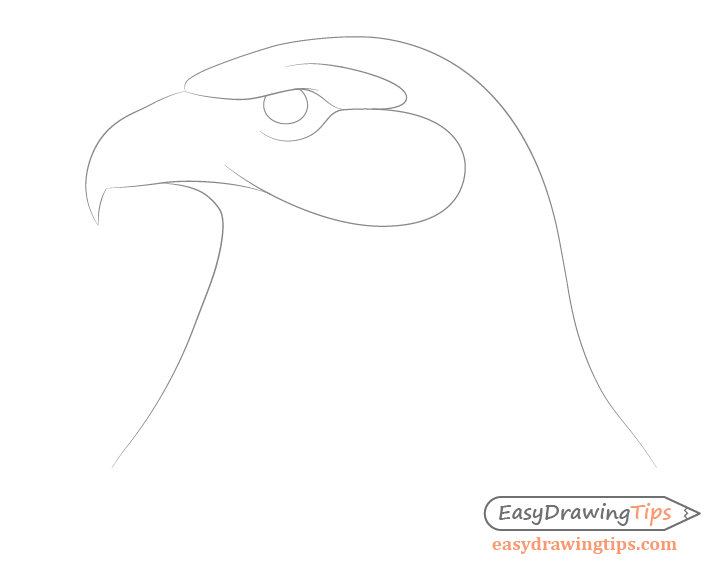
From about the middle of the shape surrounding the eye going down to about the tip of the beak outline the feather pattern of the “cheek” area. You can then extend the bottom of the bill to basically merge into it’s bottom curve.
Step 4 – Draw the Details of the Bill
Add the smaller details of the eagle’s bill as shown in the step by step breakdown below.

- Draw a line to split the beak into it’s top and bottom parts
- Add a wave like line along the beak’s upper half to define the nose area
- Show the “lips” as an outline around mouth (wider towards the base and narrower towards the tip)
- Draw a line that defines the base of the beak and splits it from the head
- Outline the nostril
Step 5 – Draw the Details of the Eye
Below you can see step by step breakdown of how to draw the eagle’s eye with all of it’s details.
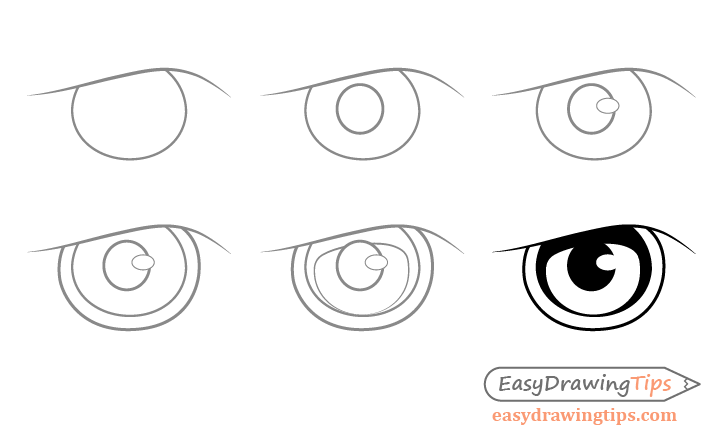
- Draw the pupil as a small circle or a light vertical oval
- Add the highlight (light reflecting from the eye) overlapping the pupil as a tiny horizontal oval (can be just about any shape depending on light source)
- Show the eyelids as an outline around the main shape of the eye
- Outline darker “in shadow” area of the eye
Save the last step in the above example for the next step of the tutorial (read below).
Step 6 – Darken the Lines
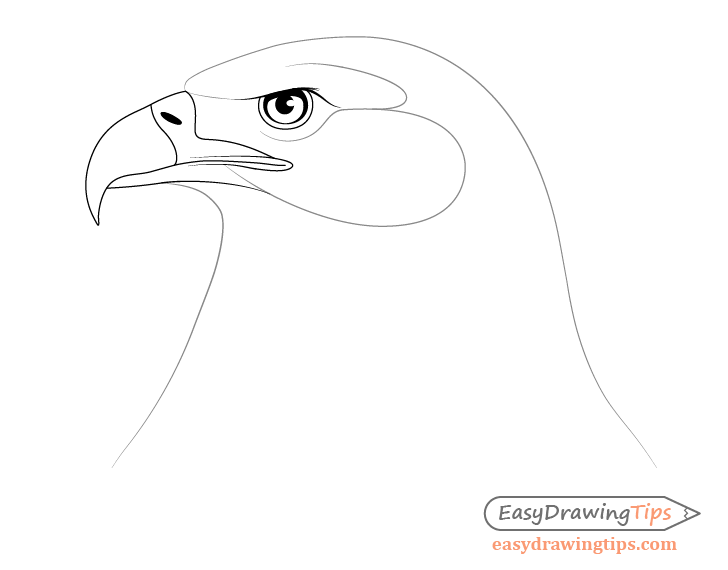
After adding the details of the eye you should have a pretty much finished basic outline of the eagle’s head. You can now begin darkening the lines you will keep for your final drawing. Either do this by pressing harder on the pencil or by using a thin black marker. However, only use the marker if you are confident that you won’t make a mistake.
Fill in the pupil and “in shadow” part of the eye with black or dark pencil shading and darken the lower eyebrow area (just above the eye). Next, also darken the outline of the bill and fill in the nostril with black or dark pencil shading as well.
Step 7 – Draw the Feathers Around the Eye
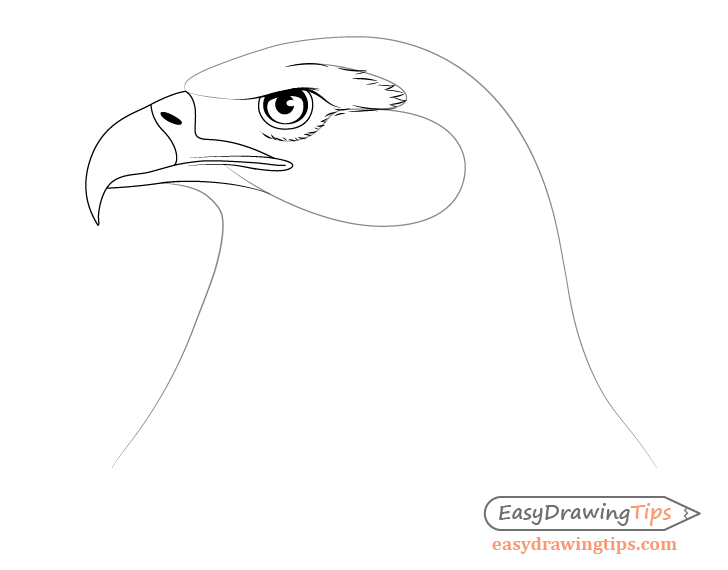
To make the eagle look more realistic and less like a wire frame add some hints of it’s feathers starting with the area around the eye. You can draw most of the larger feathers with just two curved lines for each of them. Also add some single lines here and there to create a some smaller fluff. Try to slightly vary the size and shape of the larger feathers so that they look natural.
For drawing an individual feather see:
How to Draw a Feather Step by Step
You can draw the feathers with darker outlines right away as you already have the lines from the previous steps to act as guides. Afterwards, use the tip/corner of an eraser to remove the guide lines (once you no longer need them).
Step 8 – Draw the Feathers around the “Cheek”
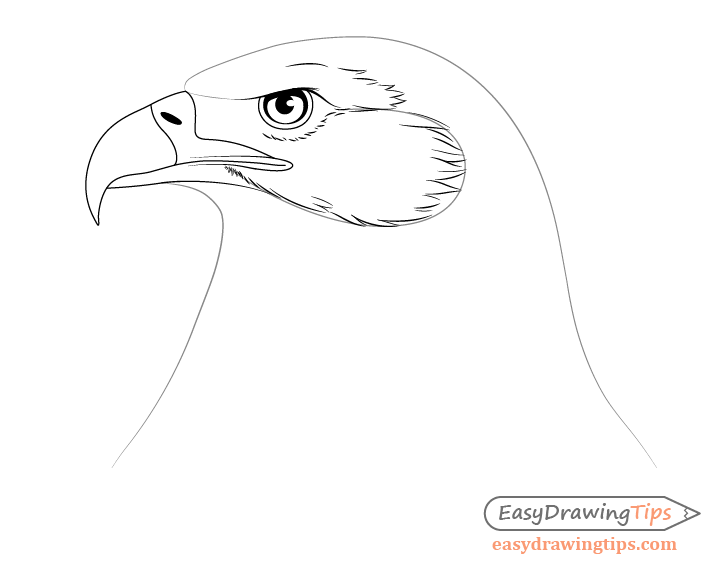
Add the feathers around the “cheek” and base of the mouth area.
The feathers below the mouth generally tend to be tiny fluff. Draw them as a series of little lines that go in slightly different directions. Make the feathers towards the back of the “cheek” much larger. Again, you can generally define their shapes with a pair of curved lines just like for those around the eye.
Step 9 – Draw the Feathers Outlining the Head
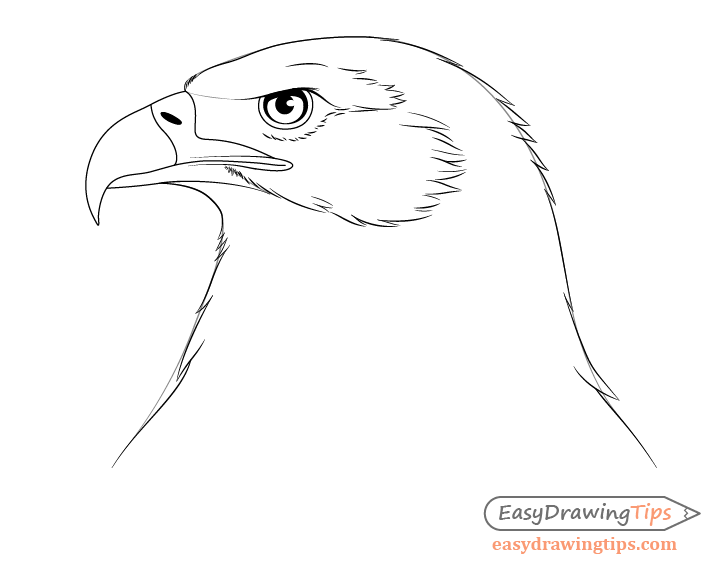
Add some feathers into the overall outline of the eagle’s head as shown in the example. In particular this should be a little bit below the bill and at the back of the head. You can also add some tiny fluff in the upper at the bill’s base.
You can erase parts of the head’s outline as needed when adding the feathers. Afterwards, darken the parts that you keep.
Step 10 – Draw the Forehead Feathers
Show some of the feather pattern around the forehead by drawing a few curved and wavy lines running up from the base of the beak. Make these of varying length with the curves and waves being somewhat random. At the same time try and draw them in a way where they all still flow in the same general direction (towards the upper/back of the head).
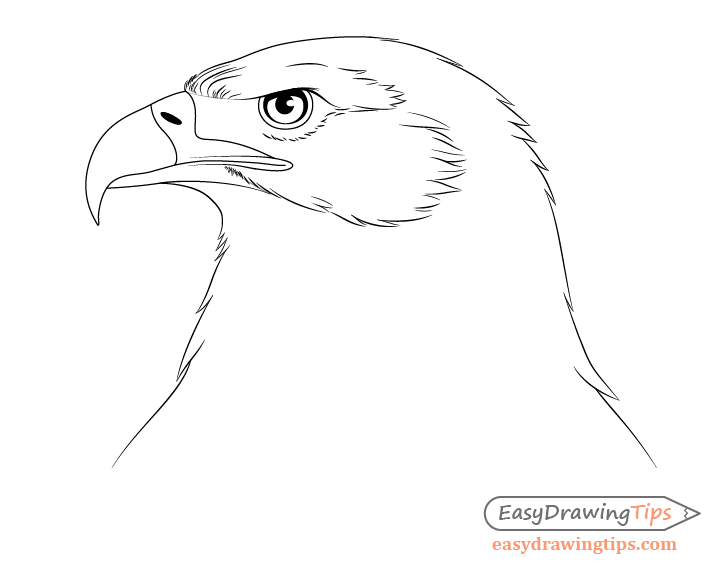
Step 11 – Add the Feathers Around the Neck
As bald eagles have white feathers on their head you can shown this by creating a sort of “upside down crown” pattern around the neck.
Make these neck feathers somewhat random in size and draw them curving in slightly different directions. Also, make most of them larger than the feathers in the other areas of the eagle’s head.
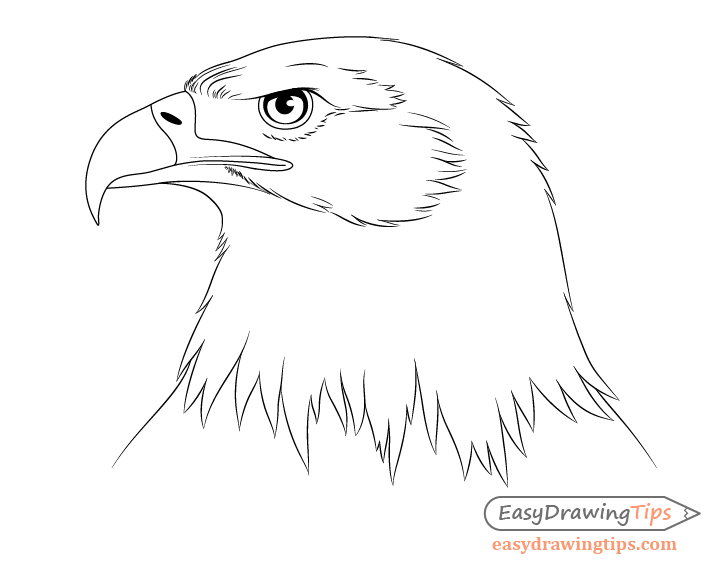
Step 12 – Finish the Eagle Drawing
Add some more feathers in small batches around the middle of the neck and back of the head. This will create an appearance of the head being covered in feathers without having to draw every single one of them.
Once you’ve added these last groups of feathers you should have a finished drawing of a bald eagle’s head.
Conclusion
An eagle is a pretty cool looking bird and a well done drawing of one can be quite impressive. This guide show how you can draw such an animal by taking it’s most characteristic features and by adding just the right amount of detail. As such, it can help you get a fairly realistic looking drawing of a bald eagle while keeping the process from getting overly complicated.
Hopefully you’ve found it easy to follow along with the steps and gained a better understanding of how you can gradually build up a drawing by starting from the larger parts of your subject and working down to the smaller details.
If you liked this tutorial and want to try some more like it also see:
- How to Draw Lion Face & Head Step by Step
- How to Draw a Wolf Face & Head Step by Step
- How to Draw a Fox Step by Step


