How to Draw Lips From 3 Different Views
This step by step tutorial looks at drawing and shading the lips from the front, three quarter and side views.
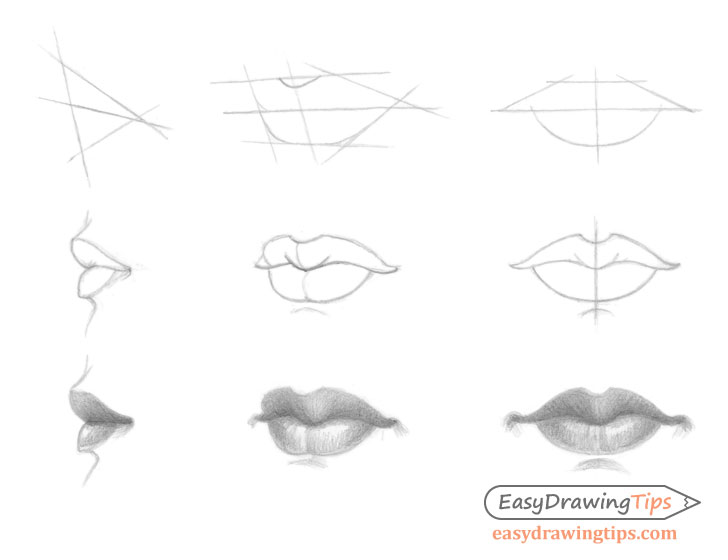
You can see a preview of the different views and drawing stages included in the tutorial above. Just like in the examples it’s recommended that you draw using a pencil.
Drawing the Lips the Front View
The front view is a good place to start if you want to practice drawing the lips as it allows you to see all of the lips. It’s also a fairly easy view to draw from.
Step 1 – Front View Lips Rough Shape Drawing
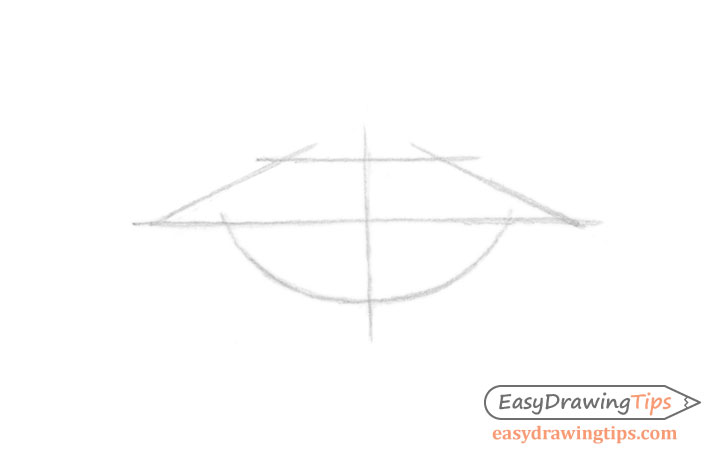
For drawing the lips in the front view start by drawing some guidelines to help you draw the shape of the lips.
First thing you will want to draw is a vertical line. This line will help you to see that both sides of the lips are roughly even in size.
You can draw a triangle with the top cut off to help you get the shape of the top part of the lips. To indicate the bottom you can draw one smooth curved line.
Step 2 – Front View Lips Outline Drawing

Within the above guide lines you can then draw an outline of the front view shape of the lips.
Step 3 – Front View Lips Shading
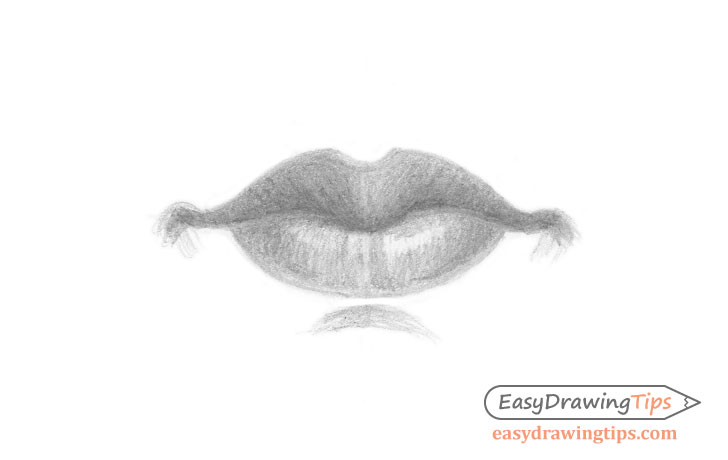
When shading the lips the darkest part will usually be the parting line between the top and the bottom of the lip. Light tends to come from above in most common lighting conditions so the top lip will tend to have darker shadows as its acting as a sort of ledge over itself. The bottom lip is the reverse of this. It will usually have lighter shading as well as a highlight area. Another thing to note when shading is that the bottom lip is actually split into two parts down the middle with each area forming a kind of little bump. You can see the three quarter view part of the tutorial to be able to better see this. As a result when shading the front view you can see that there is a little interruption in the highlight as the indent between the two bump in the lip will create a light shadow.
Shade your drawing accordingly.
One other thing to note is that the sharper (less gradient) and the brighter (whiter) you make the highlight the more wet and shiny the lips will appear.
Drawing the Lips From the Three Quarter View
The three quarter view is the more difficult view to draw the lips in but the explanation below should make it a little easier.
Step 1 – Three Quarter View Lips Rough Shape Drawing
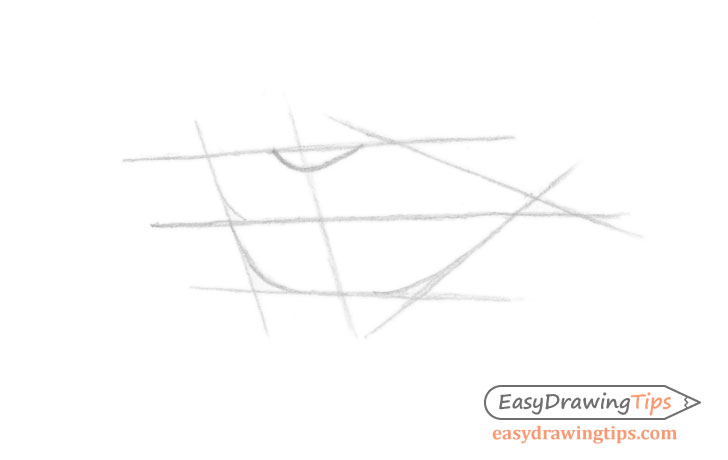
To get the shape of the lips in the three quarter view it help to have a bit of an understanding of perspective drawing.
To learn more about perspective drawing you can see:
Perspective Drawing Tutorial for Beginners
One thing that will happen due to perspective is that the side of the lips facing away from the viewer will appear slightly smaller than the forward facing side. You can see that the horizontal guile are drawing with as slight angle facing towards one another.
Another thing to note is that the far side of the lips also curves away from the viewer which will make it appear even shorter (horizontally squeezed).
Draw with these things in mind.
Step 2 – Three Quarter View Lips Outline Drawing
As already mentioned in the front view drawing of the lips the bottom lip is actually two parts. This becomes more evident when you look at the lips in the three quarter view. You can see that the bottom lip drawing is actually two small curves with the middle being a sort of indent.
There is also a bit of a bump in the middle of the top lip.
Step 3 – Three Quarter View Lips Shading

Shading the lips in three quarter view is very similar to shading to shading in the front view. Once again the darkest area will be the parting line between the two lips and the upper lip will be tend to be more in the shadow then the bottom lip.
As already mentioned one thing that is much easier to see in this view then in the front view is the dual curves in the front view. Now you can also clearly see why there is a break in the highlighted area of the bottom lips.
One again shade with this in mind.
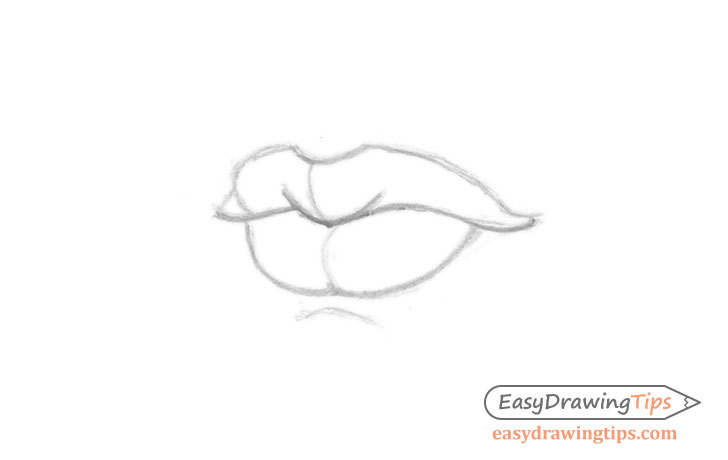
Drawing the Lips From the Side View
The side view of the lips is probably the easiest view to draw from as you don’t have to worry about perspective. As you are only drawing one side you also don’t need to worry about symmetry as you would in the front view.
Step 1 – Side View Lips Rough Shape Drawing
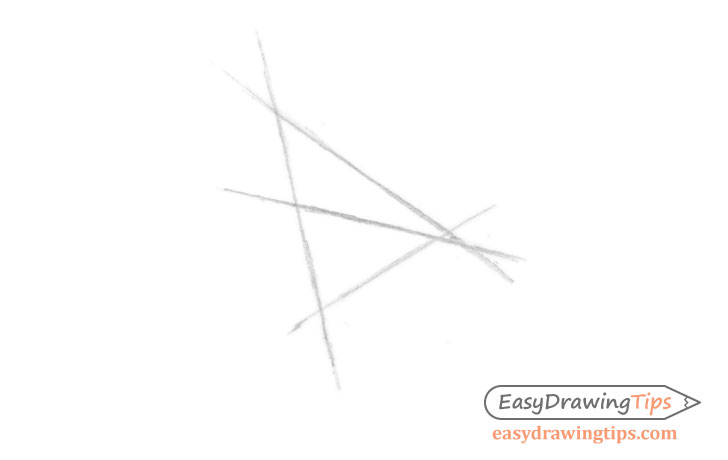
To help get the shape of the lips in the side view you can first draw a triangular shape and draw the lips within that.
Step 2 – Side View Lips Outline Drawing
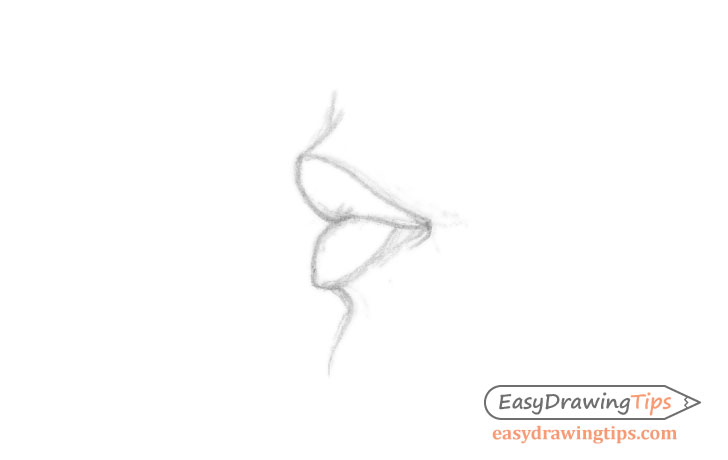
One important thing to be aware of when drawing the lips in the side view is that top lip goes out further than the bottom lip.
Step 3 – Side View Lips Shading

When shading the lips in the side view it’s a lot easier to see why the top lip has more of a shadow then the bottom. You can clearly see that if the light rays come form above most of the bottom lip will be facing away from the light casting a shadow on itself.
You can also see that the bottom lip is the reverse of this and is facing towards the light.
Once again shade the lips with this in mind.
Conclusion
Drawing and shading the lips can be a little tricky. As you can see certain things become less or more obvious in different views. But this makes it even more essential to be able to draw the lips (or many other things) from different views/angles. As things you figure out in one view can help you better draw the same object in a different view.
For drawing other facial features see:
For a drawing tutorial on the proportions of the entire female face see:


